Custom Bathroom Renovation: Avoid Costly Mistakes 2026
Custom bathroom renovation is the end-to-end redesign and rebuild of a bath space tailored to your needs, finishes, and storage. It includes planning, 2D/3D design, waterproofing, ventilation, and expert installation. For homeowners in 11 Edvac Drive, our in-house team at Altima Kitchens and Closets delivers a one-stop, design-build approach that keeps quality and timelines on track.
By Ashok, Altima Kitchens and Closets • Last updated: 2026-05-11
At a Glance
A successful custom bathroom renovation aligns layout, waterproofing, ventilation, storage, lighting, and finishes with your daily routine. Start with a clear scope and 3D design, choose durable materials, and rely on one accountable team for design, manufacturing, and installation to avoid delays, rework, and hidden issues.
This quick summary highlights how we structure a remodel so you can see the whole picture before diving into details.
- What you’ll learn: The full process, best practices, common mistakes to avoid, and how to evaluate materials and storage.
- Why it matters: Bathrooms work hard every day; waterproofing, ventilation, and layout decisions determine longevity.
- How we help: In-house design, factory-direct cabinetry, itemized quotes, and lifetime warranties on select doors.
Local considerations for 11 Edvac Drive
- Condo and HOA rules: Many GTA buildings require permits, quiet-hour adherence, and elevator bookings. Plan your remodel calendar around approvals to prevent start-stop delays.
- Seasonal timing: Winter humidity swings can impact drying and curing times for tile setting and paint; schedule buffer days for stable results.
- Logistics and access: Staging materials off-site and batching deliveries helps minimize elevator trips and hallway traffic in busy multi-unit properties.
What Is a Custom Bathroom Renovation?
A custom bathroom renovation is a made-to-measure redesign and rebuild of your bath, tailored to your space, storage, and finishes. It combines 2D/3D planning, moisture-safe construction, and precision installation to deliver a layout, cabinets, and fixtures that fit your routine, not the other way around.
Let’s define the scope so we share the same language before we plan.
- Tailored planning: 2D floor plans and 3D renderings clarify layout, clearances, and fixture placement before a single tile is set.
- Moisture-first construction: Proper waterproofing membranes, sealed seams, and slope-to-drain shower pans keep water where it belongs.
- Factory-direct cabinetry: Durable cabinet boxes, premium door finishes, and integrated organizers (pull-out hampers, tilt-out trays) designed for daily use.
- Lighting and ventilation: Layered task and ambient lighting plus right-sized exhaust keeps mirrors clear, walls dry, and air fresh.
- In-house delivery: One accountable team manages design, manufacturing, and installation, reducing hand-offs and confusion.
In our experience delivering thousands of projects across the GTA, clarity early on prevents downstream rework. That’s why we start every custom bathroom renovation with measurable drawings and a documented scope.
Why Custom Bathrooms Matter for Daily Living
Custom bathrooms elevate comfort, hygiene, and storage. The right layout reduces morning traffic, waterproofing prevents hidden damage, and cabinetry boosts organization. Over time, better ventilation and materials resist wear, mold, and moisture—helping your bathroom look great and perform reliably for years.
Bathrooms take a daily beating—humidity, cleaning products, and constant traffic. Small decisions compound into big outcomes.
- Durability pays off: Moisture-resilient surfaces and sealed seams reduce callbacks and keep grout lines intact over time.
- Organization reduces stress: Custom vanities, drawer inserts, and tall linen towers save minutes every morning and keep counters clear.
- Ventilation preserves finishes: Appropriately sized fans help reduce condensation and protect paint, mirrors, and cabinetry.
- Accessibility future-proofs: Wider entries, curbless showers, and well-placed grab bars support safer use for all ages.
Consider a busy GTA family bath: a double vanity with integrated organizers, a walk-in shower with a bench, and layered lighting saves time and keeps traffic flowing—even on Monday mornings.
How a Custom Bathroom Renovation Works (Step-by-Step)
The best process moves from discovery and 3D design to protected demolition, moisture-safe rebuild, precision tile work, cabinetry installation, and punch-list signoff. A single design-build team keeps scope, schedule, and quality under control from first drawing to final reveal.
Here’s the structured workflow our team follows so you know what happens—and when.
Step-by-step process
- Consultation and discovery: Document needs, measure site, and confirm constraints (condo bylaws, quiet hours, elevator bookings).
- 2D/3D design and selections: Finalize layout, elevations, and renderings; choose tile, vanity, countertop, fixtures, lighting, and hardware.
- Itemized scope: Provide a line-by-line document with allowances and upgrade paths for transparency.
- Protected demolition: Set dust control, floor protection, and material staging before removal.
- Rough-ins and framing: Update plumbing and electrical, frame niches and benches, and prep walls for boards.
- Waterproofing: Install backer boards, apply membranes, seal seams, and flood-test shower pans where required.
- Tile and surfaces: Set large-format wall tile and shower floors with consistent joints and movement joints at perimeters.
- Cabinetry and tops: Install factory-built vanities, set quartz counters, and fit sinks and faucets.
- Fixtures, lighting, and ventilation: Mount mirrors, lights, accessories, and confirm exhaust performance.
- Finishing and signoff: Caulk, paint, clean, and complete punch list with a documented handover.
| Phase | Owner Decisions | Altima Responsibilities |
|---|---|---|
| Discovery | Goals, must-haves, style | Measure, assess constraints, propose options |
| Design | Approve 2D/3D, finishes | Drawings, renderings, technical specs |
| Pre-construction | Calendar availability | Permits guidance, schedule, site protection |
| Build | Site access, check-ins | Trades coordination, quality control |
| Handover | Final walkthrough | Punch list, care guide, warranties |
We keep communication tight—clients receive updates and milestone confirmations so there are no surprises on installation day.

Types and Approaches to Custom Bathroom Renovation
Choose an approach based on goals and constraints: layout refresh, tub-to-shower conversion, full gut with reconfiguration, or accessibility-first upgrades. Each path balances timeline, plumbing and electrical changes, and how much storage and comfort you gain.
Different homes need different levels of intervention. Here’s how we frame options.
- Like-for-like refresh: Keep the same layout, upgrade surfaces and fixtures, and add better storage inside existing footprints.
- Tub-to-shower conversion: Remove the alcove tub, build a curbless or low-threshold shower with a niche and bench, and rework drainage and waterproofing.
- Full reconfiguration: Move plumbing and power, increase clearances, add a double vanity, or carve a linen closet from adjacent space.
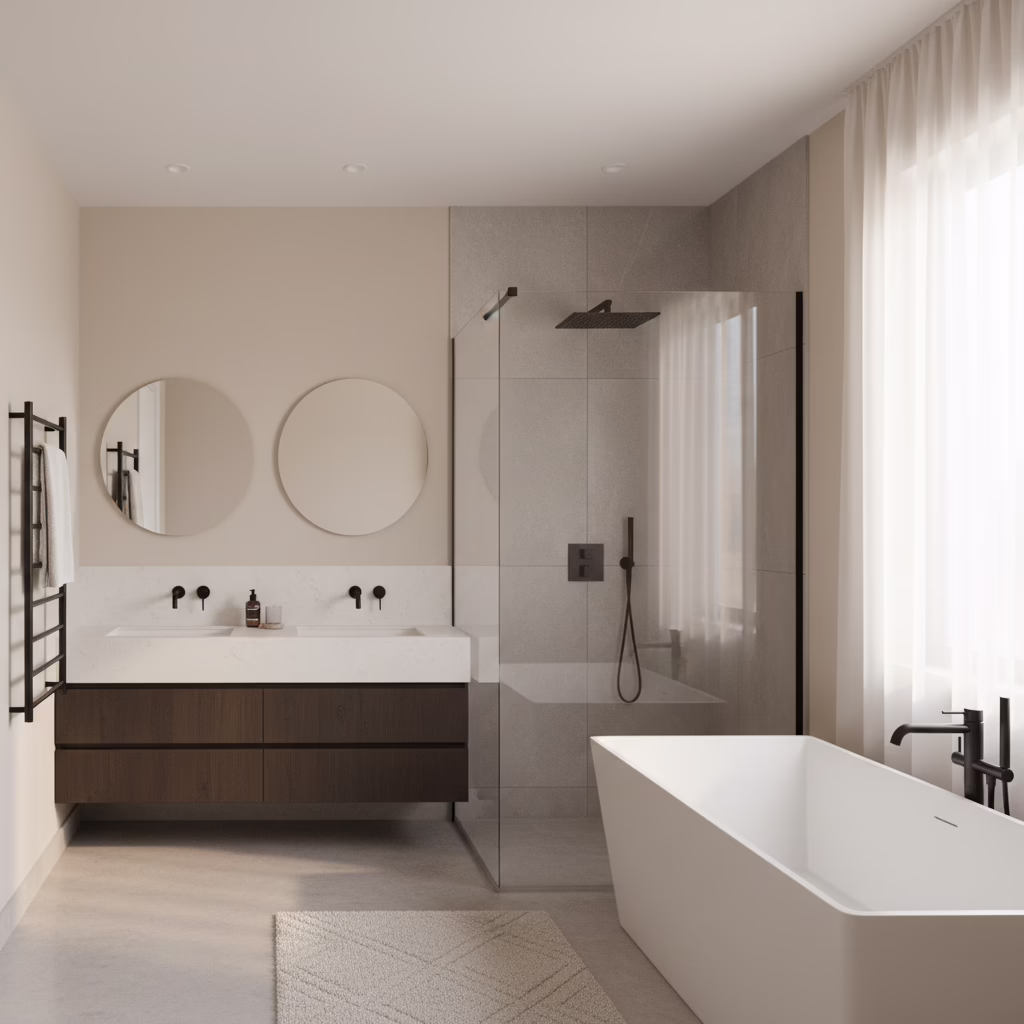
- Primary suite upgrade: Freestanding tub, large shower with dual heads, floating vanity with drawers, and upgraded ventilation and lighting layers.
- Accessibility-first: 36-inch doorways, blocking for future grab bars, slip-resistant tile, and lever handles for universal use.
We often combine a tub-to-shower conversion with a storage overhaul—think tall linen towers and deep vanity drawers with organizers. The result is a space that’s easier to clean and nicer to use every day.
Best Practices and the Mistakes to Avoid
Prioritize waterproofing, right-sized ventilation, and functional storage before chasing trends. Avoid rushed selections, weak lighting plans, and undersized shower slopes. A clear scope, vetted materials, and one accountable team prevent the most expensive mistakes.
Here are field-tested practices we rely on—and pitfalls we help clients sidestep.
Best practices that stand the test of time
- Moisture control first: Use backer boards and continuous membranes; seal all seams and corners, and slope pans consistently to drains.
- Ventilation sized for the room: Match fan capacity to square footage and duct length so mirrors clear quickly after showers.
- Lighting in layers: Pair ceiling ambient with vanity task lighting at face level; add shower-rated fixtures inside wet zones.
- Cabinetry built for bathrooms: Durable boxes, moisture-tolerant finishes, and hardware that withstands daily use.
- Smart storage inside drawers: Dividers, power-in-drawer options for hair tools, and pull-outs that keep counters open.
- Documented scope: Itemized inclusions, brand/spec confirmations, and a punch-list closeout process.
Common mistakes that get costly
- Weak waterproofing: Skipping membranes or misapplying corners invites leaks behind walls and ceilings.
- Undersized exhaust: A fan that’s too small for the run causes lingering humidity and accelerates wear.
- Poor lighting planning: One ceiling light creates shadows; vanity tasks become frustrating and unsafe.
- No storage strategy: Beautiful stone with nowhere to put toiletries becomes clutter fast.
- Rushed selections: Last-minute tile or hardware swaps cause lead-time issues and schedule resets.
- Multiple vendors: Hand-offs between designers, fabricators, and installers are where timelines and details fall apart.
Here’s the thing: most “budget blowups” trace back to late design changes or missing details. A single design-build partner keeps the plan intact from drawing to install.
Tools, Materials, and Resources We Rely On
We pair factory-built vanities and quartz tops with moisture-rated boards, membranes, and tile-setting systems. Organized selections—tile boards, door samples, and fixture spec sheets—speed decisions. Clear guides for care and ventilation keep the bathroom performing once you move back in.
Our showroom process puts all decisions under one roof so you aren’t running between stores.
- Cabinetry and tops: Factory-direct vanities, drawer organizers, and quartz counters for a durable, low-maintenance surface.
- Tile systems: Large-format porcelain for walls, mosaics for shower floors, movement joints at perimeters, and flexible sealants.
- Waterproofing kit: Backer boards, membranes, pre-formed corners, and flood-testing methods for shower pans.
- Lighting and fans: Damp- or wet-rated fixtures, dimmers for vanities, and exhaust sized for duct runs.
- Hardware and accessories: Soft-close slides/hinges, robe hooks, towel bars, and niche trims that match the faucet finish.
- Care and maintenance: Simple cleaning protocols, re-sealing schedules for natural stone, and filter checks for fans.
Want a deeper dive into design choices and organization? Our vanity design trends guide explores drawer depths, door styles, and finish durability for busy GTA homes.

Real-World Examples From Our GTA Projects
The biggest wins come from pairing storage upgrades with moisture-smart construction. A tub-to-shower conversion with a bench, niche, and tall linen tower often transforms daily use—cleaner counters, faster routines, and safer footing for all ages.
Here are anonymized snapshots to show what changes make the most difference.
- Condo ensuite refresh: We reoriented a 30-inch vanity to a 48-inch floating unit with deep drawers and a medicine cabinet. Result: clear counters and a brighter mirror area.
- Family bath conversion: We replaced a tub with a low-threshold shower, bench, and dual niches, then added a linen tower beside a new double vanity.
- Primary suite reconfiguration: By shifting plumbing, we fit a freestanding tub and enlarged the shower with two heads and a linear drain.
- Accessibility-first mini gut: Wider entry, curbless shower, blocking for grab bars, and lever handles without changing the whole footprint.
When working with homeowners in 11 Edvac Drive, we often coordinate condo approvals and elevator bookings while finalizing selections in our showroom. That parallel path shortens the overall timeline without cutting corners.
Planning Your Project: From Vision to Build
Start with a written scope and 3D design, then lock finishes and calendar dates before demolition. Coordinate condo or HOA approvals early. A single, itemized document and confirmed selections prevent delays and keep installation days productive.
Use this checklist to stay organized and confident.
- Define goals: Storage pain points, morning traffic patterns, and must-have features (bench, niche, double vanity).
- Book a design session: 2D/3D drawings clarify clearances and heights; adjust on-screen before ordering materials.
- Finalize selections: Tile, vanity, top, fixtures, lighting, hardware—record model numbers and finishes.
- Document the scope: Insist on line-by-line inclusions and allowances so expectations are precise.
- Confirm the calendar: Align material lead times with demo and installation windows; reserve elevators if applicable.
- Plan site protection: Dust control, floor protection, and material staging before work begins.
For broader project planning ideas, see our renovation timeline guide covering milestones and communication rhythms.
Water Efficiency, Ventilation, and Everyday Performance
Choose water-saving fixtures and right-sized fans to improve comfort and reduce moisture. Pair low-flow showerheads and efficient toilets with ducted exhaust sized to the room and run length. Together, they protect finishes, clear mirrors faster, and make daily routines smoother.
Small mechanical choices have outsized effects on how your bathroom feels and holds up.
- Water-saving fixtures: Modern showerheads and faucets provide strong performance while using less water, helpful for busy households.
- Toilet selection: Opt for efficient, reliable models with proven flush performance and easy-clean glazing.
- Exhaust fans: Right-size CFM to the room and duct length; long or complicated runs often need higher capacity.
- Sealed ducting: Smooth, sealed ducts and exterior terminations improve airflow and reduce noise.
For homeowner-friendly tips on water use and habit changes, see these practical water-saving ideas. They pair well with efficient fixtures for everyday savings.
Style, Storage, and Lighting That Work Together
Match a calm, durable palette with storage-rich vanities and layered lighting. Floating vanities, tall linen towers, and drawer organizers keep counters clear, while task and ambient lighting make grooming easy and safe.
Design choices should look good on day one—and still work in year five.
- Vanity strategy: Deep drawers for large items, shallow top drawers for daily tools, and internal dividers to prevent clutter.
- Mirror and medicine: Recessed cabinets add hidden storage without crowding the sink area.
- Lighting layers: Pair face-level task lighting with a dimmable ceiling source; add a shower-rated downlight.
- Finish harmony: Coordinate faucet, trim, and accessory finishes for a cohesive look that doesn’t date quickly.
If you’re exploring whole-home updates too, our custom home renovation guide shows how kitchen, closet, and bathroom upgrades can be sequenced for less disruption overall.
Trends to Keep—and the Ones to Skip
Keep trends that improve function—drawer organizers, gentle neutrals, larger tiles with fewer grout lines. Be cautious of trends that fight maintenance, like overly textured surfaces in wet zones or poor lighting swaps that create glare and shadows.
Not every trend works for high-humidity, high-traffic spaces.
- Worth adopting: Large-format porcelain, niche trims, matte finishes that hide water spots, and floating vanities for easy floor cleaning.
- Use with care: Heavy textures in showers, wood-look laminates near wet zones, or super-dark floors that show lint and soap residue.
For perspective on common pitfalls, this overview of trends to avoid in bathrooms aligns with what we’ve seen on service calls years after a remodel.
What Makes Altima’s Service Different
We’re a true one-stop shop: in-house design and installation, factory-direct cabinetry, and all selections under one roof. You get itemized scopes, 2D/3D drawings, proactive updates, and lifetime warranties on select doors—delivered by a team that builds what it designs.
Here’s how our model reduces risk and speeds decisions.
- Single accountability: One team owns drawings, fabrication, delivery, and install—no finger-pointing between vendors.
- Faster selections: Tiles, tops, doors, and hardware are reviewed together, cutting decision fatigue and mis-matched finishes.
- Factory precision: Italian CNC machinery and a professional spray booth improve consistency and finish quality.
- Transparent documents: Itemized quotes outline inclusions and upgrades so you can prioritize with confidence.
- Warranty support: Lifetime warranty on MDF Painted and Prelaminated doors reflects our material confidence.
Planning multiple spaces at once? Our custom kitchen ideas and kitchen planning guide help align cabinet styles and finishes across your home.
Checklists and Templates You Can Use
Use a single-page scope, a selections tracker, and a weekly milestone log. When everything is written down—layout approvals, model numbers, finish codes—projects run on rails and installation days focus on quality, not questions.
Here are lightweight documents our clients find invaluable.
- Scope one-pager: Project summary, plan reference, inclusions/exclusions, and milestone dates.
- Selections sheet: Tile, grout color, vanity, top, faucet, shower system, lighting, hardware—include model numbers and finish codes.
- Site readiness list: Clear path, elevator time, dust control, and staging area confirmed before demo.
- Weekly milestones: What finished last week, what’s next, and any choices needed from the homeowner.
For broader renovation prep, our itemized quote checklist outlines the questions to ask any contractor before you sign.
Thinking About Your Own Bathroom?
If you’re ready to explore options, a short design consultation with 2D/3D views clarifies layout, storage, and finish choices. You’ll leave with a documented path—so planning feels organized, not overwhelming.
Soft invite: Book a design session with Altima’s in-house team. We’ll map your layout, storage plan, and selections—then coordinate build windows around your calendar. No pressure, just clarity.
Schedule your consultation and see your bathroom in 3D before we build it.
Maintenance and Longevity Tips
Protect your remodel with simple habits: run the fan after showers, squeegee glass, use pH-neutral cleaners, and re-seal natural stone on schedule. Keep care sheets handy so the space keeps its day-one look and performance.
- Daily: Run the fan for 15–20 minutes post-shower; wipe glass and metal to reduce spots.
- Monthly: Check fan filters or grilles, clear hair from drains, and inspect caulk lines.
- Seasonally: Re-caulk small gaps, refresh grout sealer for natural stone, and test GFCI outlets.
If you’re evaluating whether a remodel is the right move now, this overview of bathroom remodeling advantages offers a homeowner’s perspective on comfort and function gains.
Frequently Asked Questions
Most homeowners ask about timing, approvals, and materials. The short answer: align design and selections first, confirm condo rules early, and choose moisture-smart systems. One accountable team keeps timeline, workmanship, and communication consistent from start to finish.
How do I start a custom bathroom renovation without feeling overwhelmed?
Begin with a short discovery session to list goals, measure the space, and create a 2D/3D design. Lock your selections and calendar before demolition. A single, itemized scope and one accountable team reduce decisions during construction and keep the schedule on track.
What are the biggest mistakes to avoid in a bathroom remodel?
Skipping waterproofing details, undersizing the exhaust fan, and neglecting storage planning cause the most problems. Also avoid late-stage finish changes. Define the scope, confirm materials, and use one design-build team to prevent delays and rework.
Do condo bathrooms require special planning?
Yes. Book elevators for demo and deliveries, follow quiet hours, and secure approvals before you start. Coordinate staging and protection plans to minimize hallway traffic. Align building rules with your timeline to prevent stop-start work.
How do I choose materials that last in a humid bathroom?
Select moisture-tolerant cabinets, quartz or sealed stone tops, large-format porcelain tiles on walls, and shower-rated lighting. Use continuous waterproofing membranes and flexible sealants in corners. Pair with a properly sized exhaust to protect finishes long-term.
Can I match my new bathroom to my kitchen or closets?
Absolutely. Reviewing door styles, finishes, and hardware across rooms creates a cohesive look. Our in-house showroom lets you compare tiles, countertops, and cabinet doors side by side to harmonize your bathroom with the rest of your home.
Key Takeaways
A clear plan, moisture-smart build, and single accountability deliver bathrooms that look great and last. Lock design and selections early, size fans properly, and invest in storage that keeps counters clear for daily comfort.
- Start with a 2D/3D plan and an itemized scope.
- Prioritize waterproofing and ventilation over trends.
- Pick storage-rich vanities and layered lighting.
- Coordinate condo approvals and elevator bookings early.
- Choose one team to design, manufacture, and install.
Where to Go Next
If you’re exploring a remodel, review planning timelines, coordinate condo approvals, and align bathroom finishes with your broader home style. The resources below help you connect the dots so projects stay organized and on time.
Deepen your planning with our renovation timeline overview and sharpen your selections with vanity design trends. Considering larger updates? This home renovation guide shows how to stage projects for fewer disruptions.
Related Posts

Why Choose Kitchen Renovation Company
Nowadays, Kitchen spaces are not only a place for cooking and serving food, but these areas act as a statement, as they speak a lot about a family, the philosophy and personality of individuals, and spaces. If you admire aesthetics and adorn the beauty of your home, you must pay attention to the interior design […]
How a Kitchen Renovation Contractor is Changing the Game
Lifestyle is all about bringing something coherent to the overall experience of living. The kitchen and closets stand as two of the most influential spaces in a home that add to the overall experience of living. A Kitchen Renovation Contractor in Whitby by the name of Altima Kitchen and Closets Inc. is changing the overall […]
How Media unit contractor in Whitby is Changing the Game
Lifestyle is all about bringing something coherent to the overall experience of living. The kitchen and closets stand as two of the most influential spaces in a home that add to the overall experience of living. A Media Unit Company in Whitby by the name of Altima Kitchen and Closets Inc. is changing the overall […]