Basement Remodel: Know What Costs the Most in 2026
Basement remodel refers to converting an unfinished or outdated lower level into livable space through moisture control, framing, insulation, mechanical upgrades, and finishes. In Brampton and across the GTA, homeowners choose a basement remodel to add functional square footage without changing a home’s footprint. Altima Kitchens and Closets delivers this with design-build precision.
By Altima Kitchens and Closets • Last updated: 2026-05-17
At a Glance
This complete 2026 guide shows you how to plan, design, and execute a basement remodel that’s dry, code-compliant, and beautiful. You’ll learn the biggest cost drivers, the step-by-step process, layout ideas, proven materials, and what to DIY versus hire—grounded in Altima’s design-build workflow for Brampton and the GTA.
Use this quick overview to jump to what you need now. We include fast answers, then detailed steps, checklists, and examples from our real-world projects.
- What is a basement remodel?
- Why it matters for GTA homes
- How the process works (step-by-step)
- What costs the most
- Types and layout ideas
- Best practices for dry, safe basements
- Materials and finishes that perform
- Tools, tech, and resources we use
- DIY vs. pro comparison
- Mini case studies
- Frequently asked questions
- Key takeaways and next steps
What Is a Basement Remodel?
A basement remodel transforms underused lower-level space into finished, livable rooms by controlling moisture, adding insulation, upgrading electrical and HVAC, framing new walls, and installing durable finishes. The goal is functional square footage—family zones, offices, gyms, suites—built to code and integrated with the rest of your home’s design.
Think of it as building a new floor inside your existing footprint. Success starts with water management and planning, then moves through design, permits, and coordinated trades. As a design-build firm, we handle each stage under one roof—consultation, 2D/3D design, factory-direct cabinetry, site work, and installation.
- Definition in practice: We convert concrete shells into comfortable rooms with proper egress, lighting, and sound control.
- Why homeowners choose it: It unlocks valuable space for media walls, home bars, guest suites, and organized storage.
- What we bring: In-house design and installation, transparent itemized scopes, and lifetime-warranty options for select doors.
For a deeper dive into our one-team model, see our design-build renovate guide that outlines timelines, approvals, and communication norms.
Why a Basement Remodel Matters for GTA Homes
A finished basement adds flexible living space, improves energy performance, and boosts long-term resale appeal. In the GTA’s variable climate, proper moisture control, insulation, and ventilation also protect the structure, reduce odors, and support healthier indoor air—key reasons homeowners prioritize lower-level upgrades.
Extra space changes daily life. Home offices, kids’ zones, and wellness rooms reduce clutter upstairs. Smart lighting and warm finishes make it feel like part of the main house—not an afterthought.
- Space you’ll actually use: Many homes gain hundreds of livable square feet for media walls, bars, or guest rooms.
- Comfort and performance: Insulation, air sealing, and dedicated HVAC balancing stabilize temperatures year-round.
- Design continuity: Our Italian-CNC-made cabinetry and spray-finished panels ensure fit-and-finish matches your upstairs style.
- Planning confidence: We provide 2D/3D designs and itemized scopes so you can visualize and decide fast.
Local considerations for 11 Edvac Drive
- Seasonal moisture swings: Expect freeze–thaw cycles and summer humidity; plan for drainage checks, dehumidification, and sealed sill plates.
- Holiday/peak timelines: If you need the space for spring or year-end gatherings, lock design approvals early to keep trades scheduled.
- GTA code coordination: Egress, smoke/CO alarms, and bathroom ventilation requirements vary; align design and permits before rough-ins.
For pre-planning tips that avoid late changes, explore our custom home renovations guide with checklists you can adapt to basements.
How a Basement Remodel Works (Step-by-Step)
A successful basement remodel follows a clear sequence: assess moisture and structure, design in 2D/3D, secure permits, rough-in utilities, insulate and air seal, close walls, finish surfaces, and complete a documented handover. A single accountable team streamlines decisions, scheduling, and quality control.
Here’s the process we use to deliver predictable outcomes and on-time handovers.
- Discovery + goals: Discuss how you’ll use the space—family room, office, gym, suite, storage.
- Basement health check: Examine drainage, cracks, and humidity; plan mitigation before any finishes.
- Concept design: We draft layouts and elevations, then iterate quickly in 2D/3D.
- Selections in one showroom: Cabinets, door styles, counters, tile, flooring, and lighting under one roof.
- Itemized scope: Transparent inclusions with upgrade paths for features you may add later.
- Permits and scheduling: Coordinate inspections, order long-lead items, and stage trades.
- Demolition and prep: Protect pathways, isolate dust, remove obstructions, and frame.
- Rough-ins: Electrical circuits, lighting, outlets, low-voltage, plumbing, and HVAC adjustments.
- Insulate + air seal: Rigid foam, mineral wool, or spray foam per plan; address rim joists.
- Close-in and finishes: Drywall, flooring, trim, paint, cabinetry, tops, hardware, and fixtures.
- Final QA + handover: Punch list, cleaning, warranty docs, and care tips.
| Phase | Primary Deliverables | Your Decisions |
|---|---|---|
| Design | 2D plan, 3D renders, selections list | Layout, materials, lighting plan |
| Rough-In | Framing, electrical/plumbing/HVAC | Outlet/lighting locations, fixture specs |
| Close + Finish | Drywall, flooring, cabinetry, paint | Finish colors, hardware, accessories |
Want a more detailed roadmap with permit notes? See our permits and value guide that expands each milestone.
What Typically Costs the Most in a Basement Remodel
The biggest cost drivers are new bathrooms, extensive plumbing or HVAC relocation, structural changes, egress window cutouts, and custom millwork like wet bars or media walls. Complexity, not just size, dictates investment—more trades, inspections, and finishes concentrate time and materials.
Here’s how scope decisions influence the budget without quoting specific prices. Use this to plan where to invest and where to simplify.
- New bathroom or shower: Requires drainage tie-ins, venting, waterproofing, tile, glass, and electrical GFCI. Wet rooms add many trades and inspections.
- Plumbing moves: Relocating stacks or adding a rough-in increases labor and concrete work; keeping fixtures aligned reduces complexity.
- HVAC rework: Duct resizing, zoning, or adding returns supplies comfort but adds sheet metal and balancing time.
- Egress windows/entries: Cutting concrete, lintels, and well systems adds engineering and waterproofing.
- Custom cabinetry and bars: Built-ins, quartz tops, and under-cabinet lighting elevate the space and require precise fabrication and install.
- Specialty rooms: Theaters (acoustics), gyms (flooring), studios (sound isolation) concentrate specialty materials.
- Floor levelling and subfloors: Self-leveling compounds, sleepers, or DRIcore-type systems improve feel but add prep steps.
To see how choices stack up, our basement finishing breakdown explains scope categories and upgrade paths you can phase in over time.
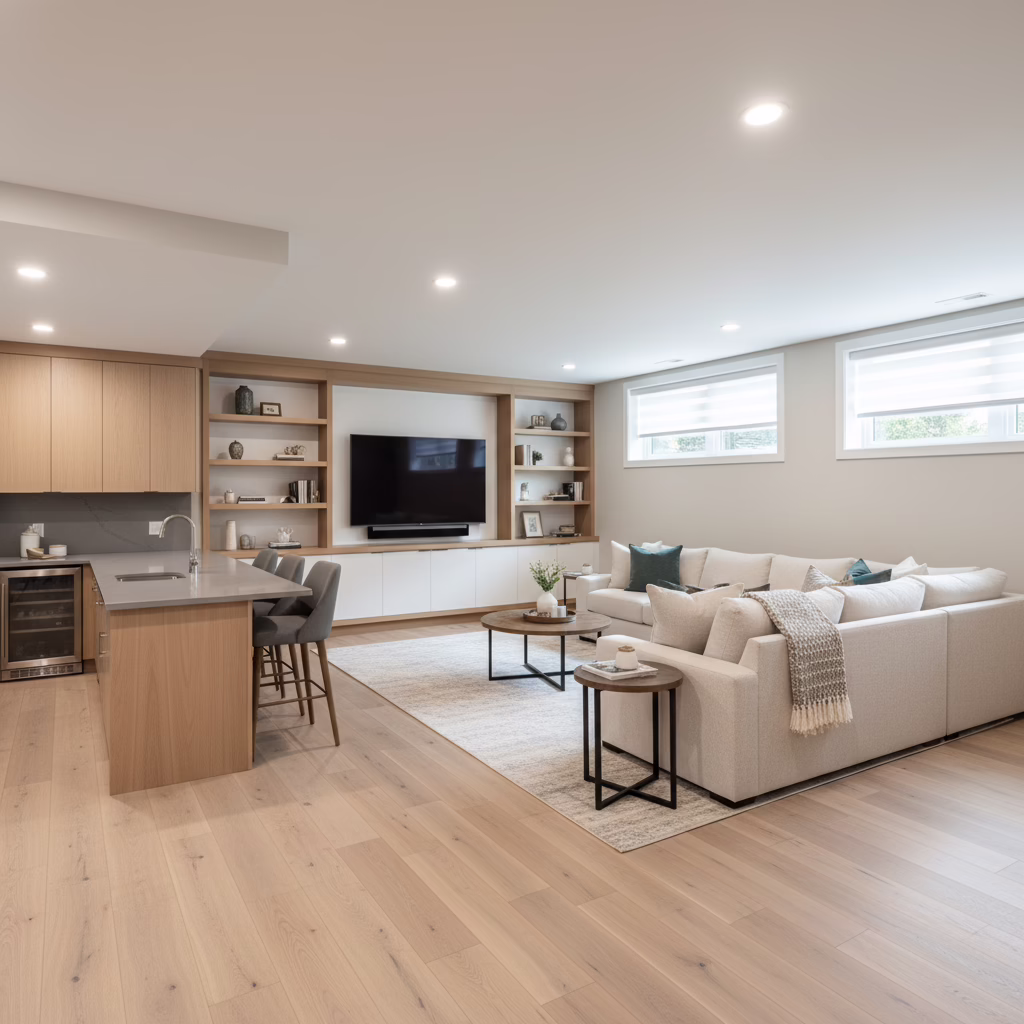
Types of Basement Remodels and Layout Ideas
Popular basement layouts include family/media rooms with integrated storage, home offices with acoustic privacy, fitness zones with resilient flooring, guest suites with full baths, and entertainment areas with a wet bar or kitchenette. Define one “anchor zone,” then stack compatible functions around it for intuitive flow.
We design for how you’ll actually live in the space—sightlines, noise control, traffic, and storage all map to daily routines. Examples we build often:
- Media wall + lounge: Custom TV unit with concealed wiring, sound bar shelf, display niches, and LED accents.
- Home bar or kitchenette: Factory-direct shaker cabinets, quartz top, tile backsplash, beverage fridge, and pantry tower.
- Office retreat: Glass partition, acoustic insulation, task lighting, and built-in desk with cable management.
- Gym corner: Rubber or LVP flooring, mirror wall, ceiling fan, and storage cubbies for gear.
- Guest suite: Bedroom with egress, closet system, and bath access with proper ventilation.
- Kid zone: Durable finishes, rounded edges, low-maintenance LVP, and built-in toy storage.
For practical inspiration, skim our actionable basement transformation tips—we show space planning moves that feel natural in day‑to‑day life.
Best Practices for Dry, Safe, Code-Compliant Basements
Dry first, finishes second. Prioritize drainage checks, sealed cracks, vapor control, and balanced ventilation before you frame. Then insulate rim joists, place outlets and lighting thoughtfully, verify egress and alarms, and select low-VOC finishes. This sequence protects air quality and long-term durability.
Basements succeed when building science leads the design. Tackle risk in this order:
- Moisture management: Confirm downspouts and grading, seal hairline cracks, and plan a dehumidifier for summer months.
- Air sealing + insulation: Treat rim joists, use rigid foam or mineral wool where appropriate, and tape/seal all seams.
- Ventilation: Ensure bath fans exhaust outside and balance HVAC supplies/returns to avoid stale zones.
- Electrical layout: Map circuits, AFCI/GFCI protection, and lighting layers (ambient, task, accent).
- Egress + life safety: Provide compliant egress for sleeping rooms, interconnect smoke/CO alarms, and confirm stair rail safety.
- Acoustics: Add insulation in ceilings or use resilient channels under drywall for quieter floors above.

Materials and Finishes That Perform in Basements
Choose moisture-tolerant materials: luxury vinyl plank or tile for floors, quartz for surfaces, moisture-resistant drywall, LED recessed lighting, and factory-finished cabinetry. Pair them with low-VOC paints and sealed trim to maintain air quality and long-term appearance.
We specify finishes that feel elevated yet easy to maintain:
- Flooring: LVP, porcelain tile, or engineered wood with a suitable underlayment for warmth and sound.
- Cabinetry: Factory-direct boxes and fronts produced on Italian CNC equipment; lifetime warranty options on select doors.
- Countertops: Quartz for durability and easy cleanup in bars or kitchenettes.
- Walls + ceilings: Moisture-resistant drywall in key areas; drop ceilings only where frequent access is needed.
- Lighting: Dimmable LEDs with layered scenes—recessed ambient plus pendants/sconces for character.
- Paints + sealants: Low-VOC products and careful caulking at baseboards to reduce dust infiltration.
Curious how small material decisions affect the plan? Our cost‑effective strategies piece shows where performance and simplicity meet.
Tools, Technology, and Resources We Use
Altima’s one-stop model combines 2D/3D design, in-house manufacturing, and professional installation. Centralized selections, Italian CNC production, and a state-of-the-art spray booth deliver precise fits and consistent finishes—backed by structured project management and proactive updates.
Our integrated toolkit keeps projects moving:
- Design systems: Scaled 2D plans and photoreal 3D visuals clarify choices before we build.
- Factory-direct cabinetry: Custom dimensions and profiles without third-party delays.
- Installation crews: Coordinated trades who know our specs and finishing standards.
- Structured workflow: From analysis and planning to on-time execution, with milestone check-ins.
- Transparent documentation: Itemized scopes with upgrade options and warranty information.
For a broader renovation perspective, see our full home renovation guide and how basements align with whole‑home comfort.
DIY vs. Pro: What to Tackle Yourself
Handle light demo, painting, and simple storage assembly yourself. Hire licensed pros for structural work, electrical, plumbing, HVAC, egress, and waterproofing. The rule: if it affects safety, inspections, or the building envelope, it belongs with an insured, permitted team.
Use this quick comparison to decide where your time delivers real value.
| Scope | DIY-Friendly | Pro-Only |
|---|---|---|
| Demolition | Trim, non-load panels, tack strips | Load-bearing walls, structural changes |
| Electrical | None (prep only) | New circuits, lighting, AFCI/GFCI |
| Plumbing | None (fixture selection) | Rough-ins, drains, venting, testing |
| HVAC | Filter changes, grille swaps | Duct sizing, zoning, returns |
| Framing/Insulation | Basic blocking | Wall/ceiling framing, foam, vapor control |
| Finishes | Painting, furniture assembly | Drywall finish, tile, cabinetry install |
When in doubt, we’re happy to advise on scope splits that keep you safe and on schedule.
Plan your basement with confidence. Book a showroom or virtual consult with our design team. We’ll map layouts in 2D/3D, review moisture strategy, and align selections in one visit.
Case Studies: Mini Before/After Scenarios
These condensed scenarios show how scope choices shape outcomes. By sequencing moisture fixes, smart layouts, and factory-direct cabinetry, we deliver comfortable, durable basements with streamlined timelines—and room to phase future upgrades.
Family Hub + Media Wall
- Challenge: Cluttered storage and a dated rec room.
- Moves: Reorganize footprint, add custom media wall, dimmable LEDs, and LVP.
- Result: A calm lounge with concealed wiring, built-in display, and easy-clean surfaces.
Work-From-Home Suite
- Challenge: Noise transfer and poor lighting.
- Moves: Acoustic insulation in ceiling, task lighting, glass partition for borrowed light.
- Result: Quiet focus area with natural feel and separate meeting backdrop.
Entertainer’s Bar + Game Zone
- Challenge: Dark corner and awkward storage.
- Moves: Shaker cabinetry, quartz top, backsplash, beverage center, and floating shelves.
- Result: A lively hosting area that keeps snacks and gear organized.

For Brampton and GTA homeowners exploring permits, moisture, and value, our expanded basement permits + value guide gathers everything in one place.
Moisture and Flooding: What to Know Before You Finish
Check grading, downspouts, and sump/backflow systems before you frame. Early fixes—sealing cracks, improving drainage, and confirming pump function—reduce future risk. If a basement has a flooding history, complete mitigation first, then select moisture-tolerant finishes.
Flooding is often the result of combined factors: heavy rain, poor grading, clogged drains, or failed sump/backflow devices. For homeowner-friendly primers, review these resources on leaky basement causes and prevention steps. Toronto-area subsidy information for protective devices is summarized here for context.
Frequently Asked Questions
These quick answers address common planning questions—timelines, permits, egress, and sequencing—so you can start confidently. For project-specific guidance, our design team can map your exact steps in a single consultation.
How long does a typical basement remodel take?
Timelines depend on scope. A straightforward family room can move from design to handover in a matter of weeks once permits and selections are approved. Adding a bathroom, egress window, or complex millwork increases coordination and inspection stages.
Do I need a permit for a finished basement?
Permits are commonly required for framing, electrical, plumbing, egress changes, and new bathrooms. Securing approvals early aligns inspections and prevents rework. We coordinate permit drawings, submissions, and scheduling within our design-build process.
What basement remodel tasks can I DIY?
Painting, simple demo, and assembling freestanding storage are reasonable DIY tasks. Leave structural work, electrical circuits, plumbing rough-ins, HVAC changes, waterproofing, and egress to licensed, insured professionals to protect safety and compliance.
Which flooring is best for basements?
Choose moisture-tolerant options like luxury vinyl plank or tile. Pair them with the right underlayment to manage minor slab imperfections, sound, and warmth. We help match performance and style to your layout and lighting.
Can you add a kitchenette or bar in any basement?
Yes—if plumbing, ventilation, and electrical plans are coordinated with the layout. Keeping sinks near existing drains simplifies work. Our factory-direct cabinetry and quartz tops make compact kitchenettes efficient and durable.
Key Takeaways and Next Steps
Start with moisture control and a clear layout, then build with code-ready plans, durable materials, and an accountable team. Decide early where to invest—bathrooms, egress, and custom millwork drive complexity—so scheduling and inspections stay smooth.
- Moisture first: Fix water issues before framing and finishes.
- Plan visually: Use 2D/3D design to finalize layouts and lighting.
- Invest where it counts: Wet rooms, egress, and custom millwork shape effort.
- Build to last: Choose basement-ready flooring, cabinetry, and lighting.
- Lean on one team: Design-build coordination reduces friction and delays.
Book a design conversation to map your basement remodel with our Brampton-based team serving the GTA. We’ll help you see your space—and its potential—in one visit.

Related Posts

Why Choose Kitchen Renovation Company
Nowadays, Kitchen spaces are not only a place for cooking and serving food, but these areas act as a statement, as they speak a lot about a family, the philosophy and personality of individuals, and spaces. If you admire aesthetics and adorn the beauty of your home, you must pay attention to the interior design […]
How a Kitchen Renovation Contractor is Changing the Game
Lifestyle is all about bringing something coherent to the overall experience of living. The kitchen and closets stand as two of the most influential spaces in a home that add to the overall experience of living. A Kitchen Renovation Contractor in Whitby by the name of Altima Kitchen and Closets Inc. is changing the overall […]
How Media unit contractor in Whitby is Changing the Game
Lifestyle is all about bringing something coherent to the overall experience of living. The kitchen and closets stand as two of the most influential spaces in a home that add to the overall experience of living. A Media Unit Company in Whitby by the name of Altima Kitchen and Closets Inc. is changing the overall […]