How to Choose Bathroom Cabinets Without Regret in 2026
Bathroom cabinet makers design, build, and install custom vanities and storage that fit your bathroom’s layout, plumbing, and style. They translate measurements into engineered drawings, fabricate durable, moisture-ready cabinetry, and complete a clean, secure install. For homeowners near the 11 Edvac Drive area, working with a local maker streamlines decisions and quality control.
By Ashok | Last updated: 2026-06-27

Overview
Bathroom cabinets should resist humidity, improve storage, and look great for years. This guide explains how expert bathroom cabinet makers work, what materials last in wet rooms, layout standards that feel right, and the step-by-step process Altima uses—from 2D/3D design to factory-direct installation.
Here’s what you’ll learn and use right away:
- Clear definitions of cabinet types (stock, semi-custom, custom) and when to choose each
- Durable materials for boxes, doors, hardware, and finishes in humid bathrooms
- Practical layout standards: common vanity widths (24–72 inches) and heights (32–36 inches)
- Workflow: measure, design, engineer, fabricate, finish, and install—without delays
- Actionable checklists to prepare your bath for a one-day installation
Local considerations for 11 Edvac Drive
- Schedule deliveries to avoid congestion near Williams Pkwy at 2500 Williams Pkwy; morning windows reduce unloading time.
- Plan weekend installs when possible to sidestep weekday activity around Bottomwood Park and keep noise to a minimum.
- For condo projects, pre-book elevator pads and hallway protection; confirm service hours with building management to prevent delays.
What is bathroom cabinet making?
Bathroom cabinet making is the end-to-end craft of designing, engineering, fabricating, finishing, and installing vanities and storage built-ins for wet environments. It marries precise measurements with moisture-ready materials so drawers, doors, and countertops perform daily without swelling, warping, or failing.
Great cabinetry starts with precise data. Accurate measurements, plumbing/electrical mapping, and usage notes (who uses the space and how) inform every decision. Typical vanity heights land between 32–36 inches for comfortable reach. Standard sink base depths measure about 21 inches, while tops usually project 22 inches to manage splash zones.
- Design intent: Turn routines into organized zones—grooming, skincare, hair tools, linens.
- Engineering: Shop drawings specify joinery, clearances, and hardware; 1/8-inch accuracy prevents onsite rework.
- Fabrication: CNC-cut components boost repeatability; edge-banding seals moisture-prone edges.
- Finishing: Professional spray systems deliver consistent, sealed coatings that stand up to humidity.
- Installation: Leveling, scribing, and silicone sealing ensure clean lines and water protection.
At Altima Kitchens and Closets, we integrate 2D/3D visuals so you can approve door profiles, colors, and accessory layouts before production. That reduces mid-project changes and speeds decisions.
For trend inspiration and space-saving ideas, our team often references insights like those in our vanity design trends guide to align finishes with your broader home style.
Why custom bathroom cabinets matter
Custom bathroom cabinets maximize storage in tight footprints, withstand daily moisture, and match your home’s design language. Properly sealed edges, durable finishes, and soft-close hardware extend service life, while tailored drawers and towers reduce morning clutter and improve accessibility.
Bathrooms face constant steam, splashes, and cleaning chemicals. Unsealed edges wick water; low-grade hardware corrodes. We specify moisture-resistant boxes and catalyzed topcoats to protect high-touch surfaces. For families, tall towers with interior outlets keep hair tools off counters. For aging-in-place, a shallower top drawer and wider knee space improve reach.
- Organization impact: A 48-inch vanity with two banks of drawers can hold 30–40 regularly used items within arm’s reach.
- Durability choices: Painted MDF doors resist expansion when sealed; prelaminated styles offer scratch resistance for kids’ baths.
- Lighting integration: Valance lighting, toe-kick LEDs, and mirror lighting reduce shadows for safer grooming.
In our experience delivering projects across the GTA, homes gain measurable day-to-day efficiency when cabinetry reflects real routines. See how storage planning pairs with shower upgrades in our small bathroom remodel guide.
How bathroom cabinet makers work (the Altima method)
Top bathroom cabinet makers follow a defined workflow: measure and assess, create 2D/3D designs, engineer shop drawings, fabricate with CNC precision, professionally finish, and perform a clean, sealed installation. This structure minimizes errors, shortens timelines, and raises final quality.
Our step-by-step workflow
- Discovery and measure: We capture room dimensions, plumbing rough-ins, and outlet placement; photos document obstacles. Tolerances of 1/8 inch avoid door rub and drawer collisions.
- 2D/3D design: You’ll review elevations and 3D views to confirm door profiles, colors, and accessories (spice-style pull-outs for skincare, hair-tool cubbies, tilt-out trays).
- Engineering: Shop drawings call out hinges, runners (often 75–100 lb ratings), clearances for P-traps, and venting gaps.
- Fabrication: Italian CNC machines cut and drill with accuracy; edge-banding seals melamine or plywood substrates against moisture.
- Spray finishing: A controlled booth lays even coats for consistent sheen; catalyzed systems resist humidity and cleaners.
- Installation: Level, scribe to walls/floors, secure to studs, apply silicone at splash points, and complete a homeowner walkthrough.
Most vanity installations complete in a single day once surfaces are prepped. Fabrication timelines vary by scope, but planning the design phase early keeps projects on track. For a holistic view of bath upgrades, explore our custom bathroom renovation guide.
Types of bathroom cabinets and approaches
Choose stock for fastest turnarounds, semi-custom for flexible sizes and styles, and full custom when you need exact fits, unique storage, or condo-friendly solutions. Pair the right cabinet type with durable materials and smart accessories for a long-lasting bath.
When to choose each type
- Stock: Fixed sizes and finishes; ideal for secondary baths or quick refreshes.
- Semi-custom: Expanded widths/depths and door styles; balances speed and personalization.
- Custom: Exact fits for alcoves, floating designs, or sloped walls; best for primary ensuites and condos.
Common layout numbers
- Vanity widths: 24, 30, 36, 48, 60, and 72 inches are common waypoints; double sinks usually start around 60 inches.
- Heights: 32–36 inches; 34–36 inches suits most adults, while family baths may land closer to 32–34 inches.
- Depths: 21 inches for cabinets; countertops often project to about 22 inches to create a drip edge.
- Towers: 84–90 inches tall; include outlets and adjustable shelves for flexible storage.
Comparison table: stock vs semi-custom vs custom
| Feature | Stock | Semi-custom | Custom |
|---|---|---|---|
| Fit | Fixed sizes | More options | Exact to space |
| Finish choices | Limited | Broad | Unlimited |
| Typical use | Guest baths | Family baths | Ensuites, condos |
| Install complexity | Low | Moderate | Varies by design |
If you’re weighing style updates beyond cabinets (hardware, lighting, mirrors), scan our cabinet hardware selection guide for practical selection tips that also apply in bathrooms.
Materials and finishes that last in bathrooms
Moisture-resistant melamine or sealed plywood boxes, painted MDF or prelaminated doors, quartz countertops, and soft-close hardware rated for damp rooms deliver long service life. Professional spray finishing and sealed edges are non-negotiable for humidity defense.
Materials choose how your vanity ages. Melamine boxes resist swelling when edges are sealed. Plywood adds screw-holding strength. Painted MDF gives smooth profiles for shaker or slab doors; prelaminated options resist scuffs in kid zones. Quartz counters shrug off splashes and cosmetics and pair well with undermount sinks for easy clean up.
- Box substrates: Moisture-resistant melamine, plywood with sealed edges.
- Doors/drawers: Painted MDF, prelaminated finishes, or wood veneers with protective topcoats.
- Hardware: Soft-close hinges/runners; look for corrosion-resistant coatings.
- Finish systems: Catalyzed paints and clear coats from a spray booth for consistent sheen and durability.
Curious about refreshing existing cabinetry? See a third-party cabinet refinishing guide for an overview of surface prep and coating basics.

Best practices bathroom cabinet makers follow
Plan for ventilation, water management, and ergonomics from day one. Leave expansion gaps, seal splash zones, prioritize drawers for daily items, integrate protected outlets, and document everything in shop drawings to prevent surprises on install day.
- Ventilation and gaps: Leave a small back clearance so warm, moist air doesn’t trap behind cabinets.
- Water defense: Use silicone at backsplashes, sink rims, and tub adjacencies; recheck annually.
- Ergonomics: Keep daily items in the top 10–14 inches of drawer height; add full-extension runners.
- Power planning: Install GFCI-protected outlets in towers or drawers for hair tools; include heat-safe liners.
- Lighting: Add toe-kick and mirror lighting to reduce shadows; motion sensors help at night.
- Protection: Felt pads and bumpers keep painted finishes pristine where doors meet frames.
Want a broad renovation view beyond cabinetry? Our bathroom home improvement guide shows how tile, lighting, and ventilation choices reinforce cabinet durability.
Tools and resources that raise quality
Accurate 2D/3D design, CNC machining, and professional spray finishing create consistent results. Add pre-install checklists and labeled shop drawings so installers arrive with everything needed for a smooth, one-day setup.
- 2D/3D visualization: Approve door styles, color, and storage before any cuts happen.
- CNC machining: Delivers square, repeatable parts and precise hinge/drill patterns.
- Spray finishing: Controlled environment for durable, dust-free coatings.
- Install kits: Shims, levels, and color-matched silicone; floor and wall protection on arrival.
- Readiness checklist: Clear room, shut off water, confirm stud locations, protect floors, and stage tops/sinks.
If you’re comparing prefabricated options for a fast turnaround, scan a manufacturer’s custom vanities overview to see typical size and configuration ranges before deciding whether semi-custom or full custom is the right move.
Case studies and real-world examples
Well-designed bathroom cabinets organize daily routines and stand up to moisture. These three scenarios show how tailored layouts, sealed finishes, and the right hardware turn tight or high-use spaces into calm, long-lasting rooms.
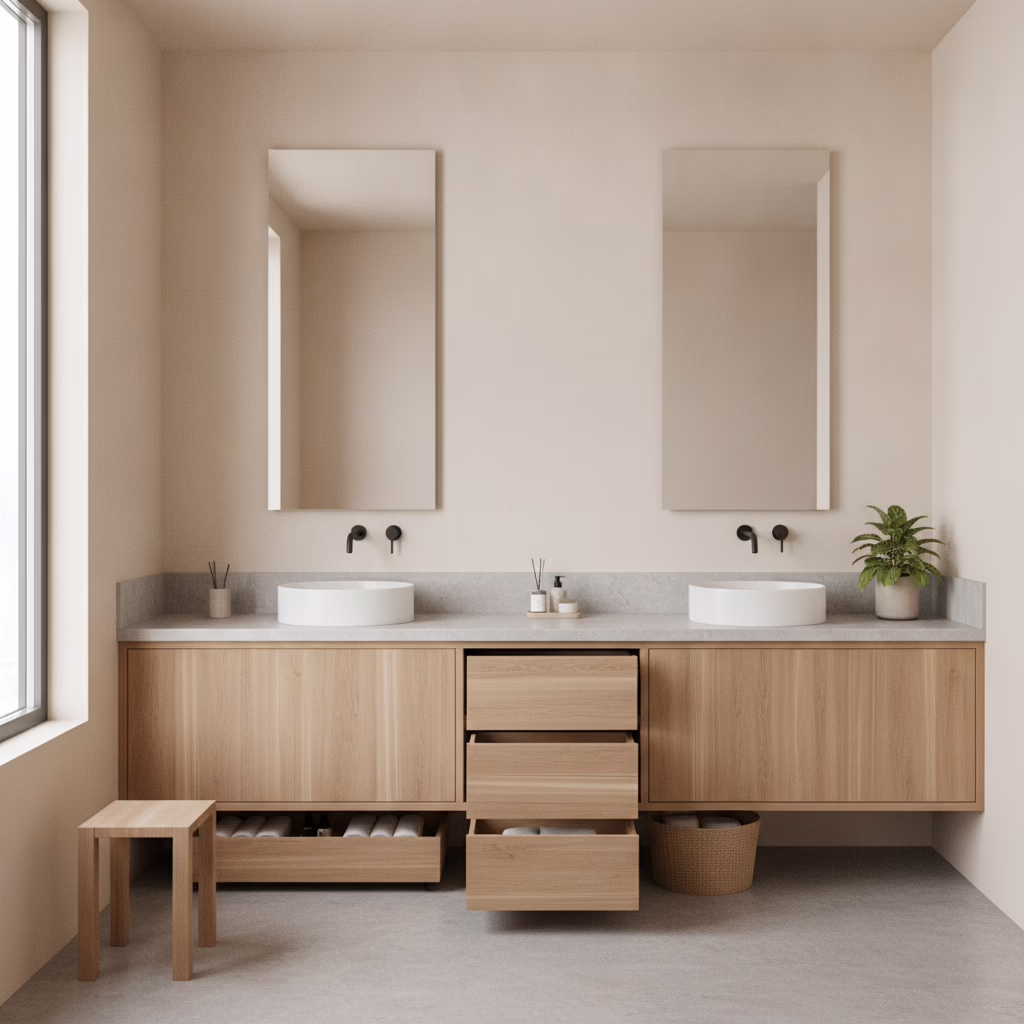
Primary ensuite: serene and smart
- Floating 72-inch double vanity with quartz top and under-cabinet lighting for a weightless look.
- Central tower with interior outlets and adjustable glass shelves; soft-close doors reduce wear.
- Sealed backs and silicone at all splash points; drawers divided for skin care, grooming, and hair tools.
Compact condo bath near 11 Edvac Drive
- Wall-hung 36-inch vanity opens floor space; a 15-inch wall cabinet adds vertical storage.
- Prelaminated door finish for scratch resistance; push-to-open hardware avoids handle collisions in tight clearances.
- Mirror cabinet with 4–6 inches depth stores daily items; integrated lighting improves task visibility.
Busy family bathroom
- 60-inch vanity with two deep drawer banks; full-extension runners rated for heavy loads.
- Pull-out hamper and tilt-out tray reduce counter clutter; tower shelves handle towels and bath toys.
- Painted MDF doors with catalyzed topcoat for wipe-clean care; toe-kick lighting for safe nighttime trips.
For more renovation examples and pitfalls to avoid, check our overview on cabinet remodel mistakes.
How to choose bathroom cabinet makers in the GTA
Choose bathroom cabinet makers with in-house design and installation, factory-direct production, 2D/3D design previews, sealed finishing, and strong local references. This one-team model shortens timelines, improves accountability, and delivers consistent quality.
- One-stop team: Confirm the same company measures, designs, manufactures, and installs.
- Factory-direct: Ask about CNC machinery and spray booth finishing for consistent quality.
- Design previews: Review 2D/3D drawings and door samples to reduce change orders.
- Warranties: Look for lifetime coverage on painted/prelaminated doors and robust service support.
- Local proof: Request references from Brampton and the wider GTA to validate reliability.
Altima Kitchens and Closets operates a Brampton showroom and factory with Italian CNC machinery and a professional spray booth. Our structured workflow—from analysis and planning to installation—keeps bath projects on time. For full renovation context, see our bathroom renovation company guide.
Installation day prep and long-term maintenance
A smooth install starts with a clear room, protected floors, shut-off water, and staged tops/sinks. Afterward, wipe splashes promptly, use non-abrasive cleaners, manage humidity, and recheck silicone seasonally to keep finishes sealed and fresh.
- Before install: Empty the room, confirm shut-off valves, and photograph existing conditions for reference.
- During install: Expect leveling, scribing, stud fastening, silicone sealing, and a quality walkthrough.
- After install: Maintain 40–60% relative humidity; wipe sink edges daily; avoid abrasive pads.
- Seasonal care: Inspect silicone at splash points; replace any cracked or pulled sections.
If you’re surveying prefab sizes to plan accessories, a manufacturer’s size overview and a typical 60-inch double vanity spec can help you visualize drawer and door configurations before meeting a designer.

Considering a new vanity? Book a design chat with Altima’s in-house team. We’ll review 2D/3D options, materials, and storage so installation day is a breeze.
Homeowner tools and checklists
Use a simple checklist to stay on schedule: confirm measurements, finalize 3D approvals, clear access paths, protect floors, and stage fixtures. This light prep helps your install finish in a single day with minimal dust and disruption.
- Approve final 2D/3D drawings with notes on handles, organizers, and lighting.
- Verify plumbing rough-ins and outlet positions; flag any surprises early.
- Remove mirrors, wall hooks, and freestanding storage before install day.
- Lay surface protection along entry paths and bathroom floors.
- Stage faucet, sink, and top nearby; confirm water shut-off and access hours.
Our structured process is the same one we apply on kitchens, closets, and more. For a sense of end-to-end coordination, skim our custom kitchen cabinets overview—the planning discipline carries over to bathrooms.
Common mistakes and how pros prevent them
The biggest bath-cabinet mistakes are poor moisture sealing, ignoring clearances, and underestimating storage needs. Pros seal edges, map every obstacle in drawings, choose hardware with corrosion resistance, and prioritize drawers where daily items live.
- Missed clearances: Doors hitting walls or mirrors—solved by accurate drawings and hinge specs.
- Unsealed edges: Swollen panels from repeated splashes—solved with edge-banding and silicone at cutouts.
- Weak hardware: Rusted or sticking slides—solved with damp-rated runners and hinges.
- Bad ergonomics: Deep, single-compartment bases—solved by multi-height drawers and dividers.
- Skipped ventilation: Musty smells—solved by air gaps and adequate exhaust fan performance.
If you’re planning broader upgrades, our bathroom renovation company guide outlines supporting trades (tile, plumbing, electrical) that interact with cabinet scheduling.
Frequently Asked Questions
Homeowners ask about timelines, materials, add-on organizers, and plumbing moves. Here are concise answers that help you plan confidently and avoid mid-project surprises.
How long does a bathroom vanity installation usually take?
Most vanity installations take a single workday when the space is cleared, plumbing is accessible, and tops/sinks are staged. Complex layouts, floating designs, or on-site modifications can extend timing, but a well-prepared room keeps the schedule tight.
What’s the difference between painted MDF doors and prelaminated doors?
Painted MDF offers a smooth, furniture-like finish and crisp profiles when properly sealed. Prelaminated doors provide strong scratch and stain resistance, making them great for kids’ or rental baths. Both perform well in humidity when edges are sealed and finishes are professionally applied.
Can I add organizers and lighting later?
Yes. Drawer dividers, tilt-out trays, and pull-out hampers are easy upgrades. For lighting, toe-kick and mirror lighting can be added with minimal disruption, especially if outlets and switches were planned during the initial install.
Do I need to relocate plumbing when replacing a vanity?
Usually not if the new vanity matches your sink location and depth. Floating designs, vessel sinks, or double vanities may require adjustments for height or trap alignment. Good drawings map rough-ins early so changes are planned—not discovered on install day.
Key takeaways
Focus on moisture-ready materials, smart storage, and a one-team process. Approve 2D/3D designs before fabrication, prep the room for a one-day install, and maintain finishes with routine cleaning and humidity control.
- Choose cabinet types based on fit needs and timeline expectations.
- Insist on sealed edges, catalyzed finishes, and soft-close, damp-rated hardware.
- Use towers and drawers to organize daily routines within arm’s reach.
- Prepare the room thoroughly to protect floors and speed installation.
- Recheck silicone and ventilation seasonally to extend cabinet life.
Ready to plan a vanity upgrade near 11 Edvac Drive? Book a discovery session with our in-house design team.
Related Posts

Why Choose Kitchen Renovation Company
Nowadays, Kitchen spaces are not only a place for cooking and serving food, but these areas act as a statement, as they speak a lot about a family, the philosophy and personality of individuals, and spaces. If you admire aesthetics and adorn the beauty of your home, you must pay attention to the interior design […]
How a Kitchen Renovation Contractor is Changing the Game
Lifestyle is all about bringing something coherent to the overall experience of living. The kitchen and closets stand as two of the most influential spaces in a home that add to the overall experience of living. A Kitchen Renovation Contractor in Whitby by the name of Altima Kitchen and Closets Inc. is changing the overall […]
How Media unit contractor in Whitby is Changing the Game
Lifestyle is all about bringing something coherent to the overall experience of living. The kitchen and closets stand as two of the most influential spaces in a home that add to the overall experience of living. A Media Unit Company in Whitby by the name of Altima Kitchen and Closets Inc. is changing the overall […]