Which 7 decisions make your kitchen renovation before and after shine?
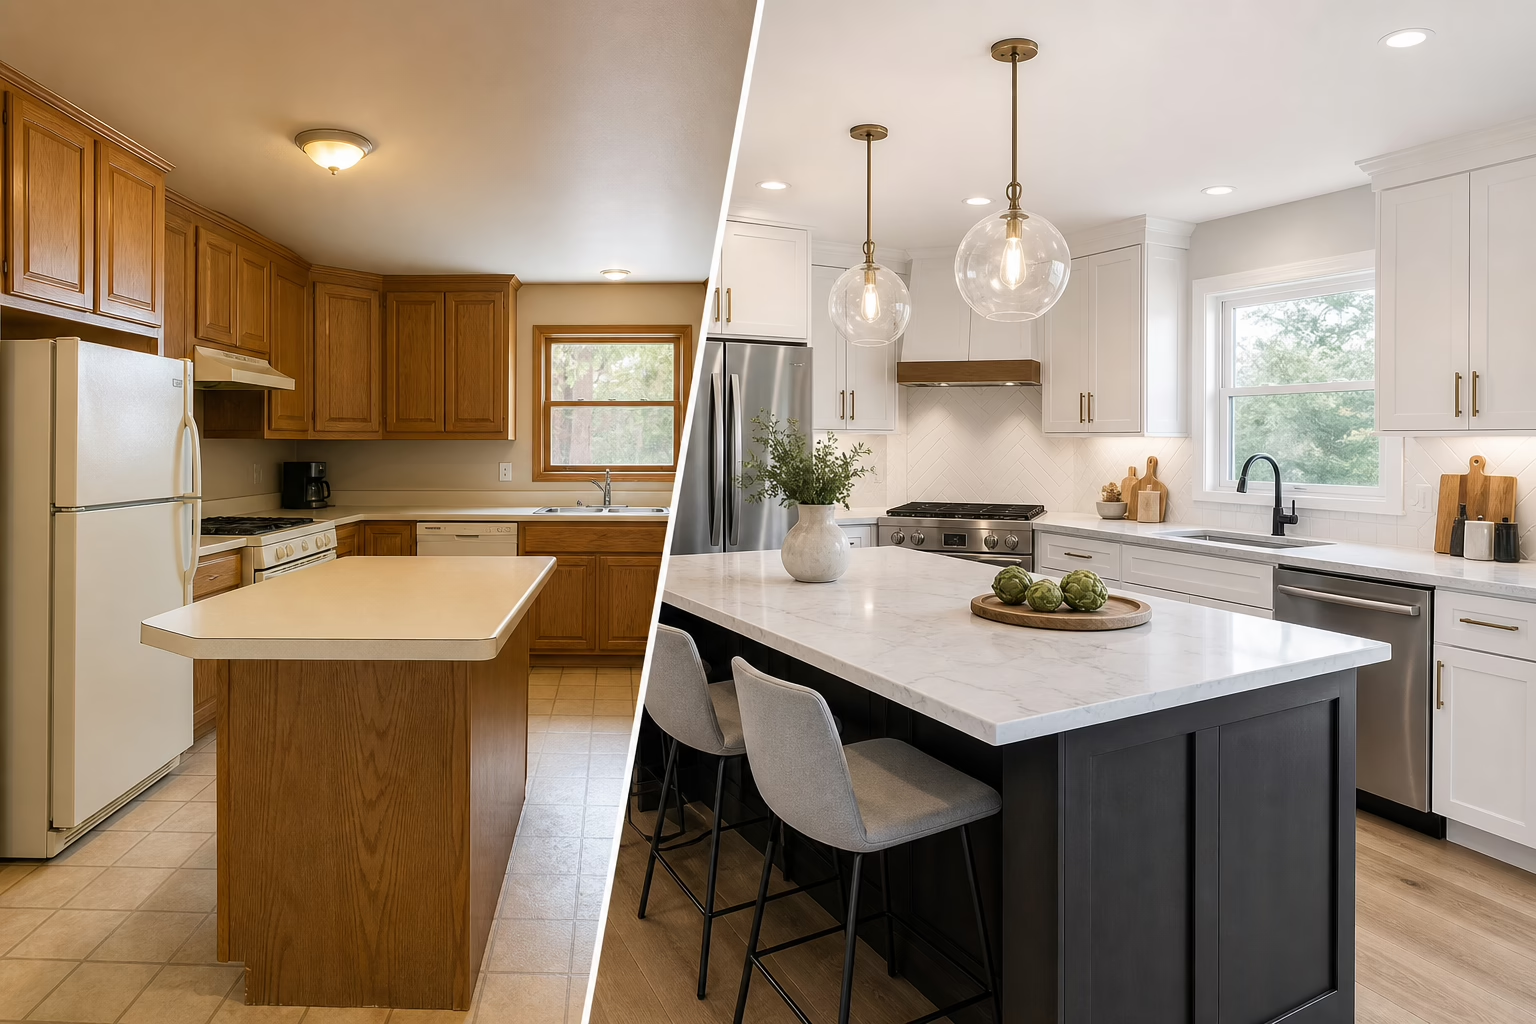
Before you demo a wall or pick a countertop, settle the choices that shape both the work and the visible transformation. This seven-item checklist is written for GTA homeowners who want accurate, itemized quotes and striking before-and-after photos. Each numbered section explains the decision to complete before demolition, what to document for the “before” shots, and how those choices affect cost, timeline and final visuals. Use the short contractor packet at the end to get clearer bids and avoid change orders.
1. Confirm scope and layout changes before demolition
Decide whether you will keep the existing footprint, open the plan, remove a bulkhead, or shift a wall. Major layout changes are the single biggest driver of time and cost and they determine how dramatic your before-and-after images will look. Removing obstructing bulkheads or reconfiguring the work triangle often produces the most visible improvement in finished photos and daily function, so confirm layout intent early when you seek bids.
What to measure and photograph
- Floor plan snapshot: measure room width, length and ceiling height.
- Bulkheads and beams: record their position and height relative to cabinets.
- Work triangle: photograph sink, cooktop and fridge from overhead and eye level.
Use 2D and 3D design previews to test layout options before committing. Early decisions reduce change orders, produce more accurate bids, and let you preview the likely visual impact in before-and-after comparisons.
2. Resolve plumbing, gas and electrical moves with appliance models finalised
Decide which appliances are staying, which will be replaced, and the exact models. Appliances determine rough-in locations, venting and electrical demand. Contractors price relocations and permitable work by the appliance and its power needs, so supplying model numbers produces tighter, itemized bids and avoids guesswork.
Appliance spec sheet checklist
- Photograph each appliance and note make, model and serial number.
- Record current water, gas and outlet locations with photos and measurements.
- Mark preferred new locations on a simple scaled sketch for the contractor.
A written appliance brief prevents deferred decisions that almost always cause cost increases and schedule slips during installation.
3. Choose cabinetry style, construction and factory options first
Select door style, finish, box material and hardware before ordering. Cabinet choices strongly influence the visual “after” and are often the central feature in photo comparisons. Factory-direct production and in-house CNC manufacturing shorten lead times and improve fit and finish because the manufacturer controls tolerances and scheduling. If lifetime warranties on MDF painted or prelaminated doors are offered, factor that into your value calculation for long-term durability and resale appeal.
Decisions that most affect the before-and-after photo
- Door profile and colour — a change here immediately alters the room character.
- Hardware style and finish — visible details that read well at a distance.
- Built-in features — pull-out pantries, integrated appliance panels and toe-kick lighting.
Request 3D renderings to confirm colour, grain and shadowing under your planned lighting so the installed result matches the visual you expect.
4. Pick countertops, backsplash and flooring that photograph well and fit the schedule

Decide material families early. Quartz, engineered stone, porcelain and hardwood have different lead times and installation sequences. Edge profiles, grout colour and floor transitions change the visual balance in finished images, so finalise these choices before fabrication starts. Begin with household needs and budget before choosing finishes to avoid expensive last-minute changes.
Comparing lead times and trade-offs
- Engineered surfaces and quartz: consistent appearance and predictable fabrication lead times.
- Natural stone: unique veining but longer templating and installation windows.
- Flooring: alignment and transitions may require scheduling coordination across trades.
Photograph swatches in place under natural and artificial light to assess how combinations will photograph in your space and to confirm cohesive pairings before ordering.
5. Plan lighting, ventilation and electrical finishes for photos and function
Layered lighting transforms before-and-after photos. Decide on ambient, task and accent lighting, undercabinet options, and ventilation method before work begins so wiring, bulkheads and hood locations are priced correctly. Proper ventilation sizing and placement also prevents late changes that can leave visible gaps or awkward bulkheads in the finished images.
Show a contractor a simple lighting plan
- Mark fixture locations and intended bulb type on a plan.
- Note undercabinet strips, valance lights and integrated cabinet lighting that affect cabinet choices.
- Specify hood type and duct route for accurate ventilation quotes.
Agreeing these electrical and ventilation items at the quote stage keeps the finished look tight and avoids visible compromises that show up in your after photos.
6. Prioritise must-haves versus nice-to-haves to control budget and schedule
Create a written brief that separates nonnegotiables from upgrades. Clear priorities let contractors provide itemized quotes and let you defer lower-priority items if costs escalate. Practical remodel guidance recommends providing a written brief, photographed measurements, and specified appliance models when you meet a contractor to get accurate bids and reduce change orders.
Simple decision matrix
- Layout and structural moves: typically highest cost and longest lead time.
- Built-in storage and cabinetry features: mid-range cost, high visual impact.
- Surfaces and finishes: visible immediately, variable costs depending on material.
- Lighting and hardware: lower cost, fast fixes that refine the final look.
Ask for itemised pricing on optional upgrades so you can protect your timeline and the before-and-after impact while keeping the project within budget.
7. Secure permits or condo approvals, finalise financing and document the ‘before’ carefully

Confirm municipal permit requirements and condo rules before work begins. Government guidance recommends checking with your municipal building department to find required permits and ensure compliance. Use the CMHC kitchen assessment worksheet or a similar condition record to note existing problems and estimate costs before you start so comparisons after the project are objective and useful.
Permit and condo-action checklist
- Contact your municipal building department to confirm permit needs for plumbing, gas, electrical and structural changes.
- If you live in a condo, check the corporation’s renovation rules, permitted hours and any required insurance or deposit.
- Finalise financing terms so scope decisions are budget-aligned; flexible financing with low or 0% down can change your project phasing options.
Before-photo shot list and measurements
- Wide shots from each corner to show layout and sightlines.
- Eye-level photos of major elevations: sink wall, stove wall, island, pantry wall.
- Close-ups of existing plumbing, electrical outlets, bulkheads and appliance labels, including make and model.
- Annotated floor plan with measured locations of utilities and fixture heights.
Keeping a consistent photo set and labelled plan makes your before-and-after comparisons credible and supports warranty or insurance claims if needed.
What to bring to your contractor meeting
Bring a written brief with must-haves and nice-to-haves, the photo and measurement packet described above, appliance model numbers, a list of preferred finishes, and a note of questions about warranties and lead times. Homeowners who arrive with clear decisions get more accurate bids, fewer change orders and faster timelines.
Editorial disclosure and selection criteria
This article highlights practical decisions and documentation steps rather than ranking contractors. Where the article references Altima’s capabilities it is because the company advertises in-house design, factory-led cabinetry production, 2D/3D previews, lifetime door warranties and 0% down financing, all of which are relevant when homeowners decide before demolition. For before-and-after inspiration and real project examples, see the Altima gallery linked below.
Frequently asked questions
Do I always need a permit for a kitchen renovation in the GTA?
Not always, but you must check with your municipal building department because permits depend on the work type. Structural, plumbing, gas and some electrical changes usually require permits, and official guidance recommends confirming requirements with your municipality before you start.
How many before photos and what measurements should I take before demolition?
Take a consistent set of wide corner shots, eye-level elevations of each wall, and close-ups of utilities and appliance labels. Measure room dimensions, ceiling height, appliance locations and distances from walls. Annotate a simple floor plan with these measurements to share with contractors.
Will 2D or 3D design previews stop expensive surprises during installation?
They reduce the risk of surprises by showing proportions, colours and clearances before fabrication. Accurate renderings help confirm cabinet fit, appliance integrations and sightlines under proposed lighting, which lowers the chance of late changes.
How does factory-direct cabinetry and a lifetime door warranty affect my long-term costs?
Factory-direct production can shorten lead times and improve quality control because the manufacturer manages fabrication and scheduling. A lifetime warranty on door finishes transfers long-term repair risk away from the homeowner, which can reduce ownership costs over time.
Key takeaway and next step
Decide the seven items above before demolition: layout, appliances and rough-ins, cabinetry, surfaces, lighting and ventilation, priority list, and permits plus documentation. Doing so yields tighter bids, fewer change orders, and a clearer, more impressive kitchen renovation before and after.
See Altima’s before-and-after gallery for real examples and to book a showroom visit.
Related Posts
Why Choose Kitchen Renovation Company
Nowadays, Kitchen spaces are not only a place for cooking and serving food, but these areas act as a statement, as they speak a lot about a family, the philosophy and personality of individuals, and spaces. If you admire aesthetics and adorn the beauty of your home, you must pay attention to the interior design […]
How a Kitchen Renovation Contractor is Changing the Game
Lifestyle is all about bringing something coherent to the overall experience of living. The kitchen and closets stand as two of the most influential spaces in a home that add to the overall experience of living. A Kitchen Renovation Contractor in Whitby by the name of Altima Kitchen and Closets Inc. is changing the overall […]
How Media unit contractor in Whitby is Changing the Game
Lifestyle is all about bringing something coherent to the overall experience of living. The kitchen and closets stand as two of the most influential spaces in a home that add to the overall experience of living. A Media Unit Company in Whitby by the name of Altima Kitchen and Closets Inc. is changing the overall […]