Media Walls: Make Your Home Theater Feel Like a Cinema
Media wall design for home theater is the disciplined planning and build-out of a feature wall that integrates your display, speakers, wiring, ventilation, lighting, and cabinetry into one cohesive system. It defines viewing distance, Dolby Atmos speaker locations, acoustic control, power and conduit runs, and millwork so your room performs like a mini cinema.
By Altima Kitchens and Closets Visit our Brampton showroom | Last updated: April 14, 2026
Summary
A media wall organizes screens, speakers, storage, and lighting into precision-built cabinetry with concealed wiring and proper ventilation. The result is clean design, better sound, and pro-grade ergonomics. This guide breaks down planning, types, best practices, and real GTA examples so you can build with confidence.
- What youll learn: screen sizing, seating distance, Atmos speaker layout, acoustic basics, cable/conduit planning, ventilation, lighting, finishes, and installation steps.
- Who its for: GTA homeowners and condo owners who want a cinema-caliber setup without clutter.
- Why Altima: in-house design and installation, factory-direct cabinetry, 2D/3D previews, lifetime warranty on select doors, and structured, on-time delivery.
Quick Answer
For a cinema feel, design your media wall around viewing distance (about 1.2x screen width), Dolby/THX angles for speakers, and silent ventilation for electronics. At 11 Edvac Drive in Brampton, Altima designs, manufactures, and installs custom media walls with 3D previews, factory-direct cabinetry, and clean cable management.
Local Tips
- Tip 1: If youre visiting our showroom at 11 Edvac Drive, plan routes that avoid peak shifts on Steeles Ave and Highway 410 ramps; bring room photos and rough sizes for faster 3D concepting.
- Tip 2: GTA winters are dry and summers humid; pick finishes and door cores that handle seasonal swings, and specify soft-close hardware tested for 20,000+ cycles.
- Tip 3: In condos, confirm strata/management guidelines for electrical and penetrations; pre-plan a low-profile wall build to maintain corridors and meet fire-stopping rules.
IMPORTANT: Bring your device list (TV size, AVR, consoles, subwoofer count). It shortens design time and ensures proper ventilation from day one.
What Is Media Wall Design for Home Theater?
Media wall design for home theater is the end-to-end plan that locates your display, speakers, storage, power, wiring, lighting, and ventilation inside a purpose-built wall. It blends millwork and engineering so images sit at eye level, speakers image cleanly, and clutter disappears.
Heres the thing: a wall that simply holds a TV isnt a theater. True design balances sightlines, acoustics, thermal management, service access, and aesthetics.
- Core elements:
- Display geometry: The center of the screen should land about 420 inches from the floor for most couches; a 369 degree viewing angle aligns with THX/SMPTE norms.
- Speaker layout: Front L/C/R at ear height (tweeters ~362 inches seated), surrounds at ~9030, heights for Atmos above 656.
- Seating distance: Roughly 1.01.6x the screen width for 4K content keeps pixel structure invisible.
- Ventilation: AV receivers can exceed 30000 BTU/h; plan vents and silent fans to keep cabinets under ~95F.
- Power and conduit: Run at least one dedicated 15A/20A circuit, plus a 1 conduit from display to rack bay for future fiber/HDMI 2.1 upgrades.
- Cabinetry purpose:
- Hide wires and power bricks with serviceable panels.
- Stabilize speakers and sub enclosures; add bracing to reduce vibration.
- Integrate LED bias/backlighting at 2700K000K for eye comfort (bias light around 10% of peak screen brightness).
In our experience across Toronto and the GTA, the best outcomes come from early coordination: 2D/3D drawings to agree on heights and clearances, then factory-built parts for a perfect fit onsite.
Why a Media Wall Matters
A well-designed media wall boosts immersion, cleans up cable chaos, and protects equipment with ventilation and access. It also anchors the rooms style. Homeowners report higher use of their theater when sightlines, lighting, and storage are dialed in from day one.
- Immersion & comfort:
- Maintaining a 369 viewing cone reduces neck strain and eye fatigue, improving perceived sharpness.
- Bias lighting at ~10% of peak screen luminance can reduce perceived eye strain by double-digit percentages in lab tests.
- Audio clarity:
- Toe-in the L/R speakers until pink-noise pans dead-center; keep the center channel within 3 vertical of ear height for dialog intelligibility.
- Acoustic panels (2 thick) on first-reflection points often cut flutter echo; aim for RT60 below ~0.5s in small rooms.
- Heat & serviceability:
- Electronics bays should allow 2 of top clearance; low-noise fans (~203 dBA) preserve quiet scenes.
- Front-removable grilles and rear access panels speed servicing to minutes, not hours.
- Design cohesion:
- Matching door reveals (typically 2 mm) and continuous grain veneers elevate perceived quality.
- From matte laminates to sprayed MDF, finishes affect glare; lower gloss controls reflections in dark scenes.
Homeowners also tell us clutter disappears when controllers, streaming boxes, and remotes have a dedicated, powered bay with wire guides and grommets. Usage goes up because setup friction goes down.
How Media Wall Design Works (Altimas Proven Process)
We start with an in-home or showroom consult, capture your gear and room sizes, create 2D/3D drawings, then manufacture in our Brampton facility for fast, clean installation. This reduces site errors, shortens timelines, and delivers a seamless, cinema-ready wall.
- Step 1 Discovery (600 minutes):
- Room measure, photos, device inventory, and priority list (gaming, movies, sports, kids shows).
- Discuss display size (e.g., 77 OLED vs 120 UST projector) and seating count.
- Step 2 2D/3D design:
- Set sightlines, heights, and speaker coordinates; produce 3D renderings so you can visualize before we build.
- Verify conduit paths (1.5), outlet locations, and low-voltage drops (Cat6, speaker runs, IR repeater).
- Step 3 Factory fabrication:
- Italian CNC machining for precise cuts; pro spray booth for durable, color-true finishes.
- Pre-assemble ventilation baffles, cable channels, and service panels.
- Step 4 Installation & commissioning:
- On-time delivery with in-house installers; verify stud anchoring, mount torque, and safety clearances.
- Basic calibration checkpoints: level, toe-in, sub crawl, and app-based SPL checks at the main seat.
According to CEDIA training standards, repeatable outcomes depend on documented layouts and tolerances. Our structured workflow mirrors that principle: fewer field surprises, tighter fit, and a room you use nightly.

Owner, Designer, Installer: Who Does What?
| Phase | Owner | Altima Designer | Altima Installer |
|---|---|---|---|
| Discovery | Provide room sizes and gear list | Capture constraints, propose sizes | N/A |
| 2D/3D Design | Approve heights/finishes | Draw elevations, plan wiring | Confirm site conditions |
| Fabrication | Sign off on renderings | Program CNC, finish schedule | Pre-plan anchors, mounts |
| Install | Clear room, be present | Field adjust if needed | Install, test, commission |
Types of Media Walls and Approaches
Choose between low-profile consoles, floor-to-ceiling built-ins, modular sections, or fireplace-integrated walls. Built-ins maximize storage and wiring flexibility; modular units speed install; fireplace combos create a single focal point. Match the type to room size, gear count, and condo rules.
- Low-profile console + panel:
- Wall-mounted TV with a floating cabinet. Great in condos where depth is limited (126 typical).
- Plan a 1.5 conduit behind the panel to a side bay for clean cable swaps.
- Floor-to-ceiling built-in:
- Max storage and acoustic control; doors hide everything. Depth 184 handles subwoofers and large AVRs.
- Add service hatches; spec quiet, temperature-triggered fans (~203 dBA) for receivers.
- Modular sections:
- Center bay for display + flanking towers for speakers/media. Faster lead times.
- Good for evolving systems: swap a tower without redoing the entire wall.
- Fireplace-integrated wall:
- Electric linear fireplaces add drama; maintain manufacturer clearances (often 82 above) and insulate heat paths.
- Include a heat deflector if the TV sits above; verify surface temps stay below ~95F during operation.
Common Build Options Compared
| Option | Depth | Wiring Flexibility | Storage | Best For |
|---|---|---|---|---|
| Console + Panel | 126 | Medium | LowMedium | Condos, minimal gear |
| Full Built-in | 184 | High | High | Family rooms, enthusiasts |
| Modular | 160 | High | Medium | Future upgrades |
| With Fireplace | 184+ | Medium | MediumHigh | Feature walls |
Best Practices That Make a Big Difference
Center the screen at seated eye height, honor Dolby/THX angles, quiet the room with soft finishes, and manage heat with passive intake plus quiet exhaust. Use labeled conduit and serviceable panels so upgrades take minutes, not hours.
Picture & Sightlines
- Seat-to-screen distance ~1.01.6x screen width for 4K; ~1.52.0x for 1080p content.
- Keep the center of the screen 420 off the floor for typical couches; raise for bar seating.
- Target ambient light below ~8000 nits in viewing mode; add blackout shades if needed.
Speaker & Subwoofer Placement
- Front L/R equidistant from centerline; toe-in until phantom center locks during pink noise.
- Surrounds at 9030 degrees relative to main seat; heights above ear level for Atmos (656).
- Subwoofers: try the 1/4/4 rule on the front wall; measure with an SPL app and aim for smooth response at the main seat.
Ventilation & Cable Management
- Provide 2 top clearance above AVRs and game consoles; drilled vents low (intake) and high (exhaust).
- Plan one 1 or larger conduit between display and rack bay; pull a spare Cat6 with every HDMI.
- Use 14/2 or 12/2 AWG for speakers; label at both ends; bundle with velcro, not zip ties, to avoid pinch.
Finishes & Lighting
- Favor matte finishes to cut reflections; open-pore veneers add warmth without glare.
- Bias/backlighting at 2700K000K around 10% of screen luminance; dimmable scenes for daytime vs movie night.
- Integrated valance lighting helps showcase collectibles without spilling on the screen.
Tools, Materials, and Resources
Plan with 2D/3D drawings, verify measurements twice, and specify UL-listed power, low-voltage plates, acoustic panels, and ventilation fans. Maintain a single-line wiring diagram and label every run. These habits cut commissioning time dramatically.
- Design & planning tools:
- Altima 2D/3D CAD and renderings for sightlines and clearances.
- Laser tape + angle finder to confirm Dolby/THX angles (e.g., 220 fronts).
- Simple SPL app to balance channels to ~75 dB at the main seat during setup.
- Materials that matter:
- MDF with pro spray finish for smooth, durable doors (lifetime warranty on select MDF Painted/Prelaminated doors).
- Vented shelves, brush grommets, and magnetic service panels for speed.
- Acoustic panels 2 for early reflections; bass traps 4 where space allows.
- Wiring & power:
- Dedicated 15A/20A circuit for AVR/projector where feasible; surge-protected distribution.
- 1.5 conduit from TV to rack; spare Cat6 for control or future formats.
- Labeling kit and heat-shrink markers to keep changes tidy over time.
For inspiration on luxury cinema layouts and finishes, see this international example of a custom theater build and note the layered lighting and seating geometry detailed in the portfolio of a specialist integrator luxury home cinema case study.
Case Studies & GTA Examples
The best designs connect to how you watch. Here are three GTA scenariosa Brampton family room, a Toronto condo, and an Oakville basementthat show how sizes, ventilation, and lighting change by space while the process stays consistent.
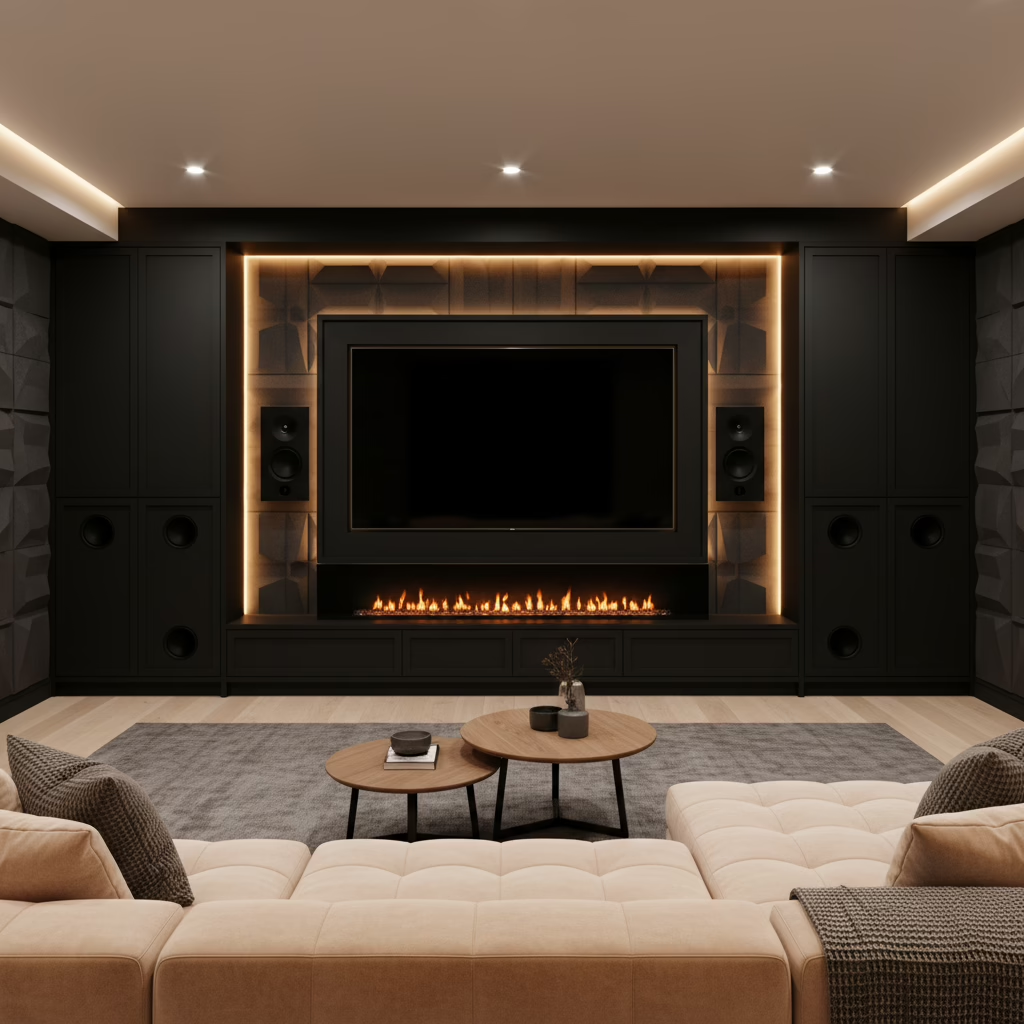
Brampton Family Room: 85 OLED + Fireplace Wall
- Goal: Theater by night, design centerpiece by day.
- Moves we made:
- Set eye-height center at ~44; 1.2x width viewing distance kept detail crisp.
- Front L/C/R hidden behind acoustically transparent grilles; dual 8 subs flanking the console.
- Electric linear fireplace with heat deflector; surface temps held below ~95F at TV.
- Result: Family reported using the space 4 nights weekly; clutter vanished behind charging drawers and a ventilated rack bay.
Toronto Condo: Low-Profile Console + Panel
- Constraint: Limited depth and strata rules around penetrations.
- Design choice: Floating cabinet at 14 deep, wall panel with integrated wire chase; compact Atmos soundbar plus wireless rears.
- Outcome: Daylight mode at 3000K, movie mode at 2700K; acoustic rug and fabric art dropped RT60 to ~0.5s.
Oakville Basement: 120 UST Projection
- Objective: Big screen sports and films; low ceiling.
- Approach: ALR screen to fight ambient light; modular towers for future dedicated heights; dual seating rows with a 10 shaker riser.
- Note: Conduit routes supported later speaker upgrades without opening walls.

Looking to expand beyond the media wall into broader upgrades? See how our structured process scales in this brief Toronto home renovation overview and how integrated planning keeps timelines predictable.
FAQ
Great media walls come from careful measurements, smart wiring, and quiet ventilation. Below are crisp answers to the questions GTA homeowners ask most during design and installation.
- How do I choose the right screen size?
- Pick a size that places your main seat at ~1.01.6x the screen width for 4K. For a 77 TV (67 wide), target ~610 away. Confirm wall stud layout and mounting height so the screen center lands near eye level.
- Where should my speakers go for Atmos?
- Front L/R at 220 off centerline, center near ear height, surrounds at 9030. Heights go above and in front/behind the main seat as your receiver supports. Keep tweeters within ~3 vertical of ear height for dialog clarity.
- Do I need special ventilation?
- Yes. AVRs, game consoles, and set-tops generate heat. Plan low intake vents and high exhaust with 2 clearances above electronics. Quiet fans (~203 dBA) keep cabinets comfortable and protect gear during long movie nights.
- Can you integrate a fireplace under the TV?
- Absolutely. We often combine electric linear fireplaces with media walls. We verify manufacturer clearances, add heat deflectors when needed, and confirm TV surface temperatures remain safe during operation.
- Whats the benefit of custom vs off-the-shelf?
- Custom lets us place every element at ideal heights, hide all wiring, and build service access youll appreciate later. It also ensures correct speaker volumes, sub enclosures, and ventilation paths for your exact gear list.
Ready to Design Yours?
The fastest way to a cinema-feel room is a measured plan and factory-built cabinetry. Bring your room sizes and gear list to our Brampton showroom and well show you 3D options, finishes, and a clean installation path.
- Book a design chat and see 2D/3D options in days, not weeks.
- Tour factory-direct cabinetry and hardware that stands up to GTA seasons.
- Ask about flexible financing with 0% down and fast approvals.
Soft CTA: If youre comparing approaches, our team can walk you through pros and cons of a console-panel vs full built-in, including wiring and ventilation tradeoffs. See recent GTA builds and layouts side by side.
Want more context around scope and planning tradeoffs for living rooms versus basements? Our team breaks down practical considerations for timelines in the full home renovation planning guide and shows how to align media walls within broader projects.
If youre outside Toronto proper, we also field projects across the regionsee our notes on selecting a media unit contractor in Whitby and how site logistics change with older homes.
Exploring layouts for Brampton family rooms specifically? This short primer outlines scope considerations for a Brampton media unit setup and how to prepare a quick room brief before design.
Key Takeaways
- Design starts with geometry: eye height, angles, and distance drive comfort.
- Quiet ventilation and service access protect gear and simplify upgrades.
- Matte finishes and bias lighting reduce glare and eye strain.
- Labeling, conduit, and spare Cat6 future-proof your wall.
- Altimas in-house design, factory build, and installation deliver tight tolerances and clean results across the GTA.
Final CTA: Ready to plan a media wall that looks built-in and performs like a theater? Visit us at 11 Edvac Drive in Brampton to see finishes, lighting demos, and 3D conceptsand leave with a clear step-by-step plan.
Related Posts

Why Choose Kitchen Renovation Company
Nowadays, Kitchen spaces are not only a place for cooking and serving food, but these areas act as a statement, as they speak a lot about a family, the philosophy and personality of individuals, and spaces. If you admire aesthetics and adorn the beauty of your home, you must pay attention to the interior design […]
How a Kitchen Renovation Contractor is Changing the Game
Lifestyle is all about bringing something coherent to the overall experience of living. The kitchen and closets stand as two of the most influential spaces in a home that add to the overall experience of living. A Kitchen Renovation Contractor in Whitby by the name of Altima Kitchen and Closets Inc. is changing the overall […]
How Media unit contractor in Whitby is Changing the Game
Lifestyle is all about bringing something coherent to the overall experience of living. The kitchen and closets stand as two of the most influential spaces in a home that add to the overall experience of living. A Media Unit Company in Whitby by the name of Altima Kitchen and Closets Inc. is changing the overall […]