Kitchen Valance Lighting Solutions: Brighten Counters Without Glare
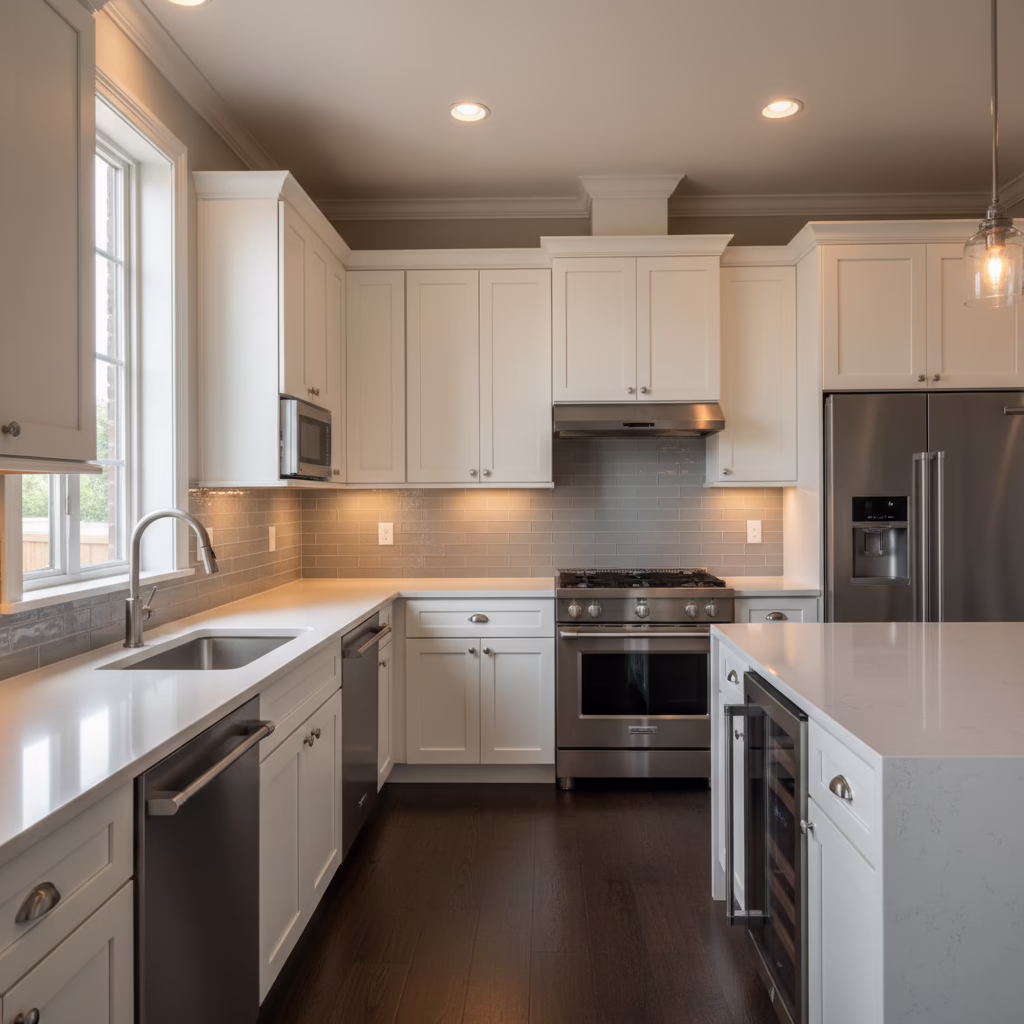
Kitchen valance lighting solutions are integrated under-cabinet lights that sit behind a cabinet’s light rail (valance) to deliver bright, even countertop illumination without visible glare. The best setups use high-CRI LED strips or bars, correct color temperature, and dimmable drivers to balance task lighting, mood, and energy efficiency in everyday cooking.
By Ashok, Altima Kitchens and Closets • Last updated: 2026-04-20
Quick Answer
Kitchen valance lighting solutions create shadow-free task light by hiding LED strips or bars behind the cabinet’s light rail. At Altima Kitchens and Closets (11 Edvac Drive at 11 Edvac Drive), we design, build, and install valance lighting as part of custom cabinetry—so wiring, dimming, and finish details are coordinated from day one.
Above the Fold: Why This Guide Matters + What You’ll Learn
Use kitchen valance lighting to brighten countertops evenly, reduce glare, and showcase backsplashes. This complete guide explains the what, why, and how—covering LED specs, layout, drivers, controls, installation, maintenance, and real GTA examples—so you can choose confidently and integrate lighting into custom cabinetry from the start.
- Who this is for: GTA homeowners and condo owners planning a kitchen renovation or cabinet refresh.
- Why it matters: Under-cabinet glare and shadows make prep harder; valance lighting fixes both while elevating design.
- What you’ll get:
- A clear explanation of kitchen valance lighting solutions and when to use them
- Actionable specs (CRI, Kelvin, lumens) and layout rules that actually work
- Install steps, pro tips, and Altima’s integrated design-build approach
- Real GTA case examples and maintenance best practices
- How to use this guide: Scan the bullets, then follow the steps and tables to finalize your plan.
Summary
Valance lighting hides LED strips or bars behind a cabinet’s light rail to deliver bright, even task light with no hot spots. Choose 2700–3500K warmth, CRI 90+, 250–450 lumens per linear foot, and dimmable drivers. Plan wire paths before cabinetry, and test dimming to avoid flicker. Integrate with backsplash and outlets.
- Best for: Task lighting over countertops, accenting backsplashes, nighttime navigation
- Key specs: CRI 90+, 2700–3500K, 250–450 lm/ft, 24V LED strips or linear bars, frosted diffusers
- Controls: In-wall dimmers, smart dimmers, or under-cabinet switches; ensure driver compatibility
- Design tip: Coordinate light placement with backsplash tile layout and receptacle positions
- Project flow: Altima designs, manufactures, and installs valance lights with your custom cabinets

What Is Kitchen Valance Lighting?
Kitchen valance lighting is an under-cabinet system where LEDs are concealed behind a cabinet’s light rail, producing smooth, shadow-free countertop illumination. The light source is hidden from view, so you see the effect—not the fixture—resulting in cleaner lines, safer prep zones, and a premium, finished look.
- Core idea: Hide the light source behind a valance (also called a light rail) for a clean, glare-free wash of light.
- Where it fits:
- Under wall cabinets over primary prep zones
- Inside pantries and appliance garages (with motion sensors)
- At floating shelves using routed aluminum channels
- Common components:
- LED strip or linear bar (24V preferred for longer runs)
- Aluminum channel with frosted diffuser to soften hot spots
- Driver (power supply) sized for total wattage with headroom
- Dimmer or smart control that matches the driver type
- Design-build advantage: At Altima, we route channels and pre-plan wiring in CAD/3D so fixtures disappear and maintenance stays easy.
According to the U.S. Department of Energy, LED lighting can use at least 75% less energy and last up to 25 times longer than incandescent—ideal for high-use kitchens. Pairing LEDs with proper diffusers also improves comfort and reduces eye strain during prep.
Why Kitchen Valance Lighting Solutions Matter
Valance lighting improves safety and comfort by eliminating shadows and glare at the countertop. It increases task accuracy, enhances backsplash finishes, and supports energy savings with efficient LEDs. Thoughtful placement and dimming transform everyday cooking, entertaining, and nighttime navigation across your kitchen.
- Better task visibility: Knife work, reading recipes, and measuring become easier with light focused on work surfaces.
- Visual comfort: Hiding diodes behind the valance eliminates harsh pinpoints and under-cabinet glare.
- Design impact: Even light spreads highlight grout lines, stone veining, and glass tile textures.
- Energy performance: High-efficacy LED strips commonly achieve 80–120 lm/W, reducing load while boosting brightness.
- Longevity: Quality LEDs and drivers routinely exceed 25,000–50,000 hours; fewer ladder trips for bulb changes.
We’ve found GTA homeowners often struggle with dark corners after installing beautiful cabinets. Integrating lighting at the factory level—our specialty—solves this without messy retrofits or visible wires later.
How Valance Lighting Works (The Simple Version)
Valance lighting hides a linear LED (strip or bar) in an aluminum channel beneath the cabinet face frame. A driver converts 120V to low-voltage power, and a compatible dimmer adjusts brightness. Diffusers spread light evenly to avoid dotted lines or hot spots on the countertop and backsplash.
- Power path: 120V supply at a junction box → low-voltage driver → LED strip/bar.
- Control path: In-wall dimmer or smart module rated for LED drivers (e.g., ELV/MLV, 0–10V).
- Heat management: Aluminum channels act as heat sinks; longer life and consistent color.
- Glare control: Frosted diffusers and set-back placement behind the rail keep diodes out of sight.
- Wire management: Routed cabinet raceways and pre-drilled grommets keep low-voltage leads invisible.
In our experience, the cleanest installs happen when lighting is specified during design—not after cabinets are on the wall. That’s why we include lighting discussions in our 2D and 3D design process before manufacturing.
Types of Kitchen Valance Lighting Solutions
The main types are LED tape strips in aluminum channels, rigid linear bars, and puck lights. Strips and bars excel at smooth, continuous light; puck lights create spot accents. Choose by cabinet length, desired uniformity, and maintenance preferences. Always add a diffuser for comfort and finish quality.
LED Tape Strips (in Aluminum Channels)
- Why use: Continuous, uniform light; easiest to conceal; flexible for corners and long runs.
- Specs to target: 24V, CRI 90+, 250–450 lm/ft, 2700–3500K for warm, inviting kitchens.
- Install notes: Mount to aluminum for heat dissipation; use solderless connectors sparingly to reduce voltage drop.
- Real-world example: In a Brampton galley, we used 24V 3000K strips with frosted covers—no dotting on a glossy subway backsplash.
Rigid Linear Bars
- Why use: Factory-straight, durable, often higher output with integrated diffusers and lenses.
- Best fit: Long, straight cabinet runs where uniformity and speed of install are priorities.
- Pro tip: Order cut lengths per cabinet bay; quick-connect harnesses speed on-site work.
- Use case: Mississauga entertainer’s kitchen—linear bars delivered perfectly even light across a 12-foot counter.
Puck Lights
- Why use: Targeted accents for framed art, niches, or select prep zones.
- Trade-off: Creates pools of light; less uniform for continuous task lighting.
- Blending approach: Combine pucks at display shelves with strips under task areas for the best of both.
- Use case: Oakville display shelving—pucks showcased ceramics while strips handled chopping zones.
Specifications That Actually Matter
Aim for CRI 90+ to render food colors accurately, 2700–3500K for warm-white comfort, and 250–450 lumens per foot for task brightness. Use 24V strips for longer runs, aluminum channels for heat, and frosted diffusers to eliminate diode spotting. Match dimmers to drivers to avoid flicker.
- Color Quality (CRI): CRI 90+ improves how fresh produce and meats look and helps match countertop samples.
- Color Temperature (Kelvin):
- 2700K: Cozy, homey warmth (pairs with oak/walnut tones)
- 3000K: Balanced warm white (our most specified)
- 3500K: Crisp yet warm (modern quartz + white cabinetry)
- Brightness (Lumens per Foot): 250–450 lm/ft covers most tasks; add dimming for night mode.
- Voltage: 24V reduces voltage drop and supports cleaner wiring for long cabinets.
- Diffusers: Frosted covers equalize light; clear covers are brighter but risk dotted reflections.
- Drivers: Size 20–30% above total load for reliability; label circuits for future service.
- Compatibility: Pair ELV/MLV or 0–10V dimmers with matching drivers to avoid flicker and audible buzz.
According to IES testing practices (LM-79/LM-80), thermal management and drive current directly influence lumen maintenance. Aluminum channels are not cosmetic—they extend life and stabilize color over years of daily use.
Layout & Placement: The Rules of Thumb
Place LEDs 2–3 inches behind the cabinet light rail and centered front-to-back. Run fixtures the full cabinet width to prevent dark gaps. Position to wash the backsplash lightly without producing dotted reflections. Pre-drill pass-throughs to maintain unbroken light between bays.
- Setback: 2–3 in from the front rail hides LEDs while maximizing counter coverage.
- Continuity: Match light length to cabinet width; avoid stopping short at fillers.
- Corner strategy: Route channels through corners with flexible couplers; test for evenness on L-shapes.
- Backsplash reflections: On glossy tile, choose deeper channels or a more frosted diffuser.
- Obstacle planning: Coordinate strip paths with outlet/USB locations and under-cabinet accessories.
We model these choices in 3D so you can see the light fall on your actual backsplash selection before production. This prevents surprises and speeds up approval.
Comparison: Strips vs Bars vs Pucks
Choose strips for continuous, flexible light; bars for durability and quick installs; pucks for accent pools. When in doubt, combine strips or bars for task zones with pucks for display shelving. Always add dimming and diffusers to balance brightness, comfort, and finish quality.
| Option | Best Use | Pros | Cons | Altima Tip |
|---|---|---|---|---|
| LED Tape Strips | Long, continuous runs | Flexible, uniform, cost-effective power per foot | Needs channels for heat; connectors can cause drop | Specify 24V, CRI 90+, frosted diffuser |
| Rigid Linear Bars | Straight cabinet banks | Durable, integrated lens, fast install | Less flexible around corners | Pre-cut per bay for neat terminations |
| Puck Lights | Accent or displays | Focused beams, attractive highlights | Uneven for task lighting | Blend with strips for function + style |
Best Practices (What Pros Do Differently)
Pros plan lighting with cabinetry, not after install. They route channels, pre-wire, label drivers, and test dimming with the selected LEDs. They choose CRI 90+ at 3000K for most homes, size drivers with 20–30% headroom, and hide all terminations in accessible but invisible locations.
- Design first: Lock lighting specs during design so cabinet machining and wiring are integrated.
- Mockups: Build a one-bay sample to confirm diffuser choice and Kelvin before ordering full runs.
- Driver access: Centralize drivers in a pantry, basement ceiling, or valance cavities with service access.
- Documentation: As-built diagrams and labeled leads save hours in future upgrades.
- Dimming tests: Validate compatibility on-site to eliminate shimmer/flicker at low levels.
Google’s Search Central notes that helpful content reflects real expertise. Our field teams in Brampton, Toronto, and Mississauga bring that expertise by installing thousands of linear feet of under-cabinet lighting each year—and refining these practices on real projects.
Tools, Materials, and Resources
You need quality LED strips or bars, aluminum channels, diffusers, a compatible low-voltage driver, and a rated dimmer. Add clean pass-through grommets, wire labels, and heat-safe adhesive. Pros also use a clamp meter and dimming tester to validate load and compatibility on-site.
- Core materials: 24V LED strip or rigid bar, aluminum channel, frosted diffuser, end caps
- Power/control: Low-voltage driver, ELV/MLV or 0–10V dimmer, smart bridge (optional)
- Installation aids: Mounting clips, wire loom, pass-through grommets, cable staples
- Quality checks: Clamp meter, multimeter, dimmer compatibility chart, sample board for Kelvin/CRI
- Design tools: 2D plans and 3D renders (provided in-house by Altima) to confirm placement
According to a 2025 homeowner survey by multiple design publications, integrated lighting ranks among the top three “most-loved” kitchen upgrades because it’s used every day and impacts both function and ambiance.
Step-by-Step: How We Install Valance Lighting
Plan power early, route channels at the factory, and connect runs with minimal connectors. Centralize drivers, test dimming, and seal diffusers. Label everything. This workflow produces invisible wiring, even light, and simple service access—hallmarks of a professional under-cabinet system.
- Design & Spec: Confirm CRI, Kelvin, lumens/ft, and control type in your 3D design review.
- Power Planning: Identify 120V feed and driver location; calculate total watts with 20–30% margin.
- Factory Prep: Route channels, drill pass-throughs, and pre-fit diffusers using Italian CNC precision.
- Rough-In: Pull low-voltage leads and mount junction boxes at planned locations.
- Cabinet Install: Hang boxes level; confirm spacer and filler sizes accommodate continuous lighting.
- Fixture Mounting: Install strips or bars to aluminum; terminate runs with soldered or locking connectors.
- Driver & Dimmer: Mount driver, connect to dimmer type (ELV/MLV/0–10V), and verify load with clamp meter.
- Testing: Check for uniformity, flicker, and glare on the chosen backsplash; adjust diffuser if needed.
- Closeout: Label circuits, document as-builts, and provide a quick user walkthrough.
We often integrate pantry lighting and appliance garage switches during the same visit, so your whole workstation ecosystem feels consistent.

Integration with Backsplash, Outlets, and Countertops
Coordinate lighting with backsplash layout, outlet placement, and countertop reflectivity. Continuous light lines look best when outlets are either concealed or aligned. Matte tiles reduce reflections; glossy tiles may need deeper channels or more diffusion to avoid visible diode patterns.
- Backsplash planning: Align channels with tile courses; avoid cutting tiles around protruding fixtures.
- Outlet strategy: Use under-cabinet plugmold or backsplash color-matched receptacles to reduce visual clutter.
- Countertop reflectivity: High-gloss surfaces may amplify dots—choose deeper channels/frosted covers.
- Edge considerations: Light rails should match door style; we fabricate to the millimeter for seamless lines.
See how we approach finishes in our stunning kitchen renovation guide, where lighting and tile coordination play a central role in final polish.
Controls and Smart Home Options
Use LED-rated dimmers matched to your driver type. For smart homes, add hub-connected dimmers or modules to schedule scenes like Prep, Dine, and Nightlight. Motion sensors work well inside pantries and appliance garages, keeping hands free and lights on only when needed.
- Dimmer pairing: Verify ELV/MLV or 0–10V compatibility with your chosen driver before ordering.
- Smart scenes: Prep (100%), Entertain (60%), Nightlight (10–20%).
- Hands-free zones: Motion sensors in pantries and toe-kick nightlights keep traffic safe after dark.
- Voice and app control: Integrate with common platforms for convenience.
We program a quick “walkthrough scene” during handoff so your family can live with the system immediately, then fine-tune later.
Maintenance, Safety, and Upgrades
LED valance systems require minimal upkeep: wipe diffusers during kitchen cleaning, keep drivers ventilated, and check connectors annually. Quality components last years, but upgrading to higher-CRI strips or smarter controls is easy when wiring and access are documented at closeout.
- Simple care: Use a soft microfiber on diffusers; avoid harsh chemicals that can haze plastics.
- Driver ventilation: Don’t cover drivers with stored items; heat shortens life.
- Annual check: Inspect terminations for looseness; dimming issues often trace to connections.
- Future-ready: With documented runs, swapping to tunable-white or higher-CRI later is straightforward.
DOE field guidance highlights that proper thermal management and driver quality are primary predictors of longevity. We design each system with those two levers in mind.
Pricing & Value Considerations (No Numbers—Only What Affects Them)
Value depends on component quality, run lengths, control sophistication, and integration level. Factory-routed channels, matched dimmers, and documented wiring improve reliability and reduce service time. Transparent, itemized quotes help you choose where to prioritize performance versus features.
- What drives value: CRI/Kelvin accuracy, diffuser quality, aluminum heat sinking, driver type, and control platform.
- Scope factors: Number of cabinet bays, run continuity, corner treatments, and pantry integrations.
- Efficiency gains: LEDs deliver daily savings; dimming extends life and comfort.
- Altima approach: We provide itemized options—lighting, accessories, and finishes—so you invest where it matters most.
If you’re comparing renovation paths, our home value kitchen ideas walk through upgrades that consistently delight homeowners long after install day.
Case Studies: GTA Kitchens That Got It Right
Successful projects start with integrated design. These GTA case snapshots show how cabinetry, lighting, backsplash, and controls come together for real families. The common thread: early planning prevents dark spots, visible wires, and compatibility surprises after installation.
- Brampton Family Galley:
- Challenge: Narrow counters, glossy tile reflections, dim evenings.
- Solution: 24V, 3000K CRI 90+ strips in deep channels, drivers centralized in pantry.
- Result: No diode reflections, smooth prep light, simple dimming scene for nighttime snacks.
- Downtown Toronto Condo:
- Challenge: Limited electrical access and very short cabinets.
- Solution: Rigid bars cut to exact lengths; plug-in driver hidden in appliance garage.
- Result: Continuous light without visible terminations and fast maintenance access.
- Mississauga Entertainer’s Kitchen:
- Challenge: Long island and wall run needing consistent color and output.
- Solution: Linear bars for the main run + pucks for display shelving; ELV dimming for silent low levels.
- Result: Perfectly even task light and dramatic evening ambiance for hosting.
- Vaughan Chef’s Prep Zone:
- Challenge: Color-critical plating and photography.
- Solution: CRI 95+ strips at 3500K, matte backsplash tile to avoid dotting, 0–10V dimming.
- Result: True-to-life food tones and comfortable brightness at any time of day.
- Oakville Family Hub:
- Challenge: Kids’ late-night snacks and early breakfasts without waking everyone.
- Solution: Motion-activated toe-kick nightlights + valance on a “Night” scene (15%).
- Result: Safe, gentle pathway lighting and happier mornings.
For broader renovation context, see our cabinet care tips that keep finishes, hardware, and lighting looking new.
Frequently Asked Questions
Valance lighting FAQs cover specs, dimming, and integration with cabinetry and backsplashes. Focus on CRI, Kelvin, and diffuser quality for comfort. Plan wiring before cabinet install, and ensure drivers and dimmers are compatible to avoid flicker and buzzing.
- How bright should under-cabinet valance lighting be?
Most kitchens work well at 250–450 lumens per linear foot. Aim higher on dark stone or when counters sit deeper than average. Always include dimming so you can drop to 10–30% for late-night use without losing orientation.
- What color temperature looks best with white cabinets?
We typically recommend 3000K for a warm but crisp look with white or light gray cabinets. If your palette is very warm (natural oak, brass), 2700K complements it nicely; modern, bright-white schemes often look great at 3500K.
- Can I retrofit valance lighting after my cabinets are installed?
Yes, but planning ahead is cleaner. We can conceal wiring with surface channels and strategically placed grommets. Centralizing the driver in a nearby pantry or base cabinet usually keeps retrofits tidy and serviceable.
- Do I need puck lights if I have strips?
Not necessarily. Strips or bars provide the best uniform task light. Use pucks only when you want accent pools on display shelving or art. Many clients blend both for function and style.
- Will LEDs flicker when dimmed?
They shouldn’t. Flicker typically indicates a mismatch between the dimmer and driver. We pair the correct ELV/MLV or 0–10V dimmer with your driver and test at low levels to ensure smooth, silent dimming.
Local Tips
- Tip 1: Visiting our Brampton showroom at 11 Edvac Drive? Plan route timing around Steeles Ave and Highway 410 traffic to make material and lighting selections in one visit.
- Tip 2: Winter months get darker early—schedule your lighting mockup after 4 PM to preview valance scenes in low light and fine-tune Kelvin and diffuser choices.
- Tip 3: For condo projects, building rules can limit electrical work hours. We coordinate with property management so lighting rough-ins and final installs stay on schedule.
IMPORTANT: These tips keep design, manufacturing, and installation aligned with GTA logistics and condo bylaws while we manage your project end-to-end.
Free Design Walkthrough: Book a 30-minute lighting and cabinetry consult. We’ll review CRI/Kelvin choices, mock up a bay, and show you how valance lighting integrates with your custom cabinets and backsplash.
Key Takeaways
Choose CRI 90+, 2700–3500K, and 250–450 lm/ft. Hide LEDs in aluminum channels with frosted diffusers, and match dimmers to drivers. Plan wiring with cabinetry for invisible installs and simple service. Use strips or bars for task light, add pucks only for display accents.
- Design early: Specify lighting in your 3D review to avoid visible wiring later.
- Comfort first: Diffusers and placement beat raw lumen output for daily usability.
- Document runs: Labeled leads and as-builts pay off every time you upgrade.
- Integrate systems: Coordinate with backsplash tile and power locations for a unified look.
Related Articles
Explore renovation topics that pair naturally with valance lighting: planning, cabinetry care, and value-driven upgrades. These resources help you align lighting with finishes, storage, and long-term maintenance for a cohesive kitchen experience.
For a bigger-picture plan, our complete kitchen renovation guide sets the blueprint. Want durability tips that keep lights and doors looking new? See our cabinet maintenance tips. If you’re mapping high-impact upgrades, don’t miss value-boosting kitchen ideas.
Related Posts

Why Choose Kitchen Renovation Company
Nowadays, Kitchen spaces are not only a place for cooking and serving food, but these areas act as a statement, as they speak a lot about a family, the philosophy and personality of individuals, and spaces. If you admire aesthetics and adorn the beauty of your home, you must pay attention to the interior design […]
How a Kitchen Renovation Contractor is Changing the Game
Lifestyle is all about bringing something coherent to the overall experience of living. The kitchen and closets stand as two of the most influential spaces in a home that add to the overall experience of living. A Kitchen Renovation Contractor in Whitby by the name of Altima Kitchen and Closets Inc. is changing the overall […]
How Media unit contractor in Whitby is Changing the Game
Lifestyle is all about bringing something coherent to the overall experience of living. The kitchen and closets stand as two of the most influential spaces in a home that add to the overall experience of living. A Media Unit Company in Whitby by the name of Altima Kitchen and Closets Inc. is changing the overall […]