Custom Home Bar Cabinet Ideas to Save Space & Impress (2026)
Custom home bar cabinet ideas are practical, design-led ways to turn unused corners, nooks, or walls into organized, guest-ready drink stations. The best solutions match your room size, storage needs, and hosting style, then integrate smart cabinetry, lighting, and appliances so your bar looks stunning and works effortlessly day to day.
By Altima Kitchens And Closets — GTA design-build renovation with in-house manufacturing. Last updated: April 15, 2026.
Overview
This guide shows you how to plan, design, and build a custom home bar cabinet that saves space and elevates hosting. You’ll find layouts, storage ideas, lighting, finishes, appliance tips, and real GTA examples—organized into checklists and steps you can follow or hand to your contractor.
- What a custom home bar cabinet is and how it fits your space
- Why a built-in bar boosts storage, style, and resale appeal
- How to plan: measurements, clearances, and ergonomic heights
- Popular styles: built-in wall bars, under-stairs, closet conversions
- Smart storage: wine racks, glass holders, pull-outs, appliance bays
- Lighting & finishes that make bottles and glassware shine
- Appliance selection: beverage centers, icemakers, and sinks
- Step-by-step process from 3D design to installation
- Tools, resources, and a printable checklist
- Mini case studies from real GTA-style projects
Quick Answer
The easiest way to get custom home bar cabinet ideas off the ground is to pair a compact layout (36–48 in. wide) with vertical storage, 2700–3000K LED lighting, and an undercounter beverage center. At our 11 Edvac Drive showroom in Brampton, we design, manufacture, and install complete bars in-house with 2D/3D previews.
 1")
What Is a Custom Home Bar Cabinet?
A custom home bar cabinet is a tailored storage-and-serving station for beverages, designed around your room, bottles, glassware, and appliances. It blends cabinetry, counters, lighting, and accessories—often with a beverage fridge or sink—to create a compact, efficient, and beautiful hub for everyday use and entertaining.
Here’s the thing: “bar” can mean many things—from a 36-inch-wide niche with a beverage center to a 10-foot wall with sink, ice, and seating. The common thread is purposeful storage, ergonomic access, and finishes that complement adjoining rooms.
- Core elements: base cabinets, upper storage (shelves or doors), counter, lighting, and often an undercounter appliance.
- Typical dimensions: 24 in. counter depth; 36 in. counter height; 42 in. bar-height top if adding stools; 15 or 24 in. appliance widths are standard.
- Electrical & plumbing: GFCI outlets near wet areas; shut-off valves; vented icemakers and fridges per manufacturer specs.
- Design alignment: match door profiles, paint sheen, and hardware to your kitchen, media unit, or adjacent living space.
Self-contained unit, wet bar, or “dry” beverage center—regardless of label, the fundamentals stay the same: clear categories for bottles and glassware, easy cleanup, and lighting that makes everything pop without glare.
Why Custom Home Bar Cabinets Matter
Custom home bar cabinets maximize underused space, keep countertops clutter-free, and make hosting smoother. With right-sized storage and clear categories, you reduce setup time, protect glassware, and create a focal point that coordinates with your kitchen and living areas.
- Organization boosts enjoyment: labeled zones (spirits, mixers, tools) cut prep time. Designers often aim for 36–42 in. of clear walkway to avoid congestion during gatherings.
- Safeguards glassware: stemware racks keep rims safe; soft-close hardware reduces breakage and noise.
- Lighting elevates mood: warm LEDs at 2700–3000K highlight textures and bottle colors without harshness.
- Design continuity: when finishes match nearby cabinetry, the bar reads intentional—not an afterthought.
- Everyday utility: beverage centers aren’t just for parties; they offload the main fridge and help families store seltzers, juices, and snacks.
In our experience across the GTA, well-planned bars quickly become high-traffic “command centers.” They corral clutter, look great on video calls behind you, and anchor how you welcome guests.
How a Custom Home Bar Cabinet Comes Together
The best approach is plan → visualize → build: measure the space, choose a layout, confirm appliance specs, then finalize finishes in 2D/3D before fabrication. Professional install completes plumbing/electrical, aligns doors and reveals, and calibrates lighting for even, warm illumination.
- Measure and map: note ceiling height, outlets, studs (often 16 in. on center), and any HVAC or structural limits.
- Confirm clearances: 24 in. counter depth, 1–1.5 in. scribe margins, 36–42 in. aisle clearances, door swing paths, and ventilation per appliance cut sheets.
- Lock the appliance plan: pick 15 in. or 24 in. beverage centers, icemaker needs (water line, drain), and optional sink (bar faucets are usually 8–10 in. tall).
- Preview in 2D/3D: Altima provides drawings so you approve storage, heights, and lighting positions before we build.
- Fabricate & finish: factory-direct cabinetry, CNC precision, and spray-booth finishing ensure consistent sheen and color.
- Install & test: level boxes, align doors, set toe kicks (3–4 in.), silicone seams at splash, test GFCI and lighting drivers.
| Phase | What Happens | Key Checks |
|---|---|---|
| Planning | Site measure, appliance selection, storage wish list | Ventilation specs, water line route, outlet locations |
| Design | 2D/3D drawings, finish samples, hardware choices | Door swings, bottle heights, stemware clearance |
| Fabrication | Cabinetry built in factory with CNC machining | Color consistency, hardware counts, edge banding |
| Installation | Boxes leveled, tops templated/installed, hookups | Reveals even, silicone lines neat, LEDs dim correctly |
Want to see your concept before build? Our in-house 3D kitchen design process applies perfectly to bars and helps you visualize lighting and open-shelf styling.
 2")
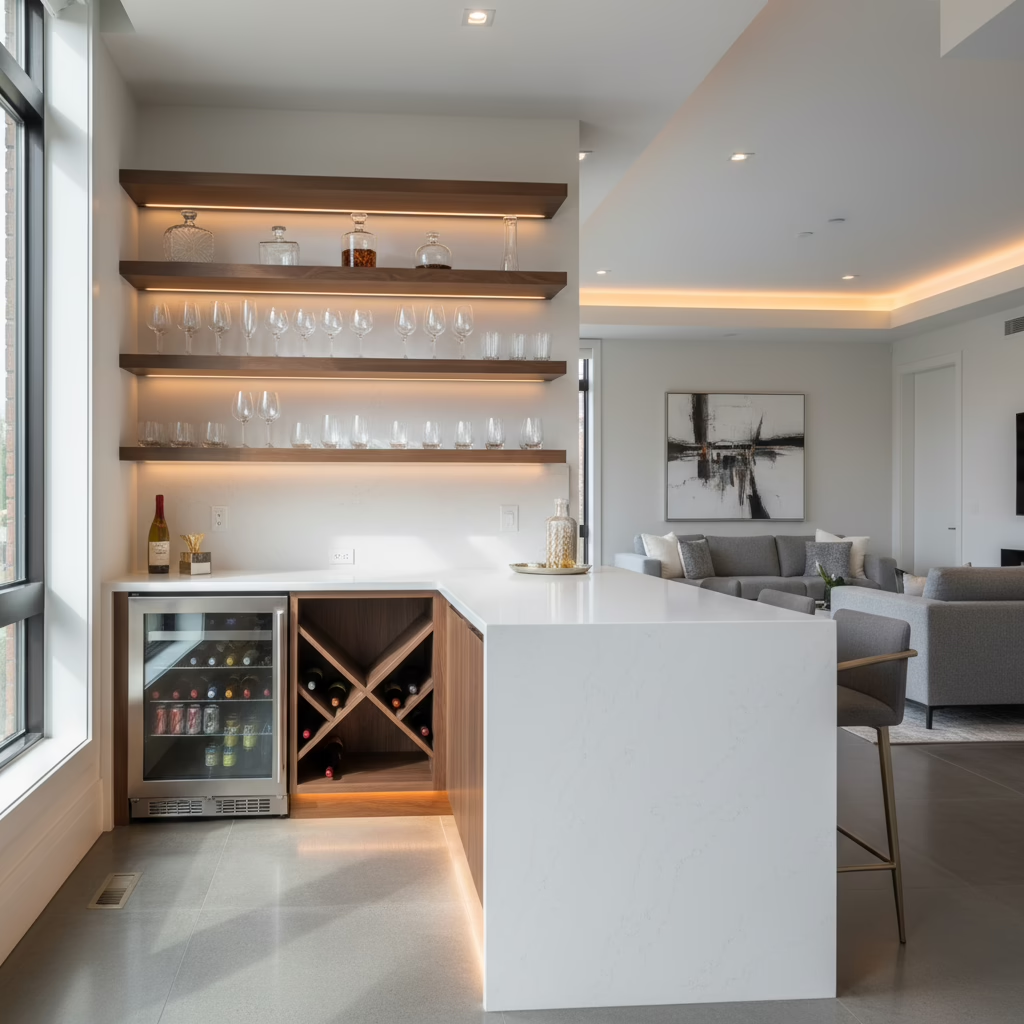
Styles, Layouts, and 13 Custom Home Bar Cabinet Ideas
Choose a layout that fits your wall length and traffic flow, then layer storage and lighting. Popular options include 36–60 in. niche bars, 8–10 ft. feature walls, under-stairs builds, closet conversions, and peninsula bars with seating. Use warm LEDs, glass uppers, and an appliance bay sized to 15 or 24 inches.
Space-Savvy Layouts
- Single-wall niche (36–60 in. wide): base + uppers, 24 in. depth, 36 in. counter; perfect for a small living room alcove.
- Feature wall (8–10 ft.): symmetrical towers, illuminated shelves, and a centered beverage center or sink for balance.
- Under-stairs bar: tapered side panels, angled shelves, and pull-outs maximize odd geometry; toe-kick LEDs add drama.
- Closet conversion: remove bifolds, add a short return panel, finish the interior with panels and LED strips for a hidden bar.
- Peninsula with seating: 42 in. bar top height; 12–15 in. knee space; 24–30 in. per stool for comfort.
Cabinet & Storage Ideas
- Adjustable bottle cubbies: design for 12 in. depth; mix 3×3 and 4×4 grids; keep heaviest bottles in base cabinets.
- Stemware protection: underside racks spaced 3–4 in. apart; mount 10–12 in. below the shelf to clear tall glasses.
- Pull-out organizer: 6–9 in. spice-style pull for syrups/bitters; 12–18 in. pull-out for taller bottles and shakers.
- Trash and towel pull-out: keep cleanup easy with a 15 in. double-bin unit and a side-mounted towel bar.
- Drawer inserts: walnut dividers for tools; shallow (3–4 in.) for strainers/stirrers; deeper (6–8 in.) for bar towels.
Lighting that Works
- LED strip lights (2700–3000K): place under shelves and inside glass uppers; use diffusers to avoid hot spots.
- Accent puck lights: 2–3 per upper cabinet or evenly spaced on shelves for focused highlights.
- Dimmers and scenes: pre-set “Everyday,” “Hosting,” and “Late Night” scenes so the bar always looks right.
Finishes & Hardware
- Quartz or porcelain tops: durable, easy to wipe; waterfall edges frame the bar elegantly.
- Painted MDF doors: pair with our lifetime-warranty options for longevity and a refined look.
- Hardware: 5–7 in. pulls for base cabinets; knobs for uppers; consider matte black or brushed brass for contrast.
- Backsplash: full-height slab for drama or 2×8 ceramic tiles laid in a stacked pattern for a modern rhythm.
Appliance Bays
- Beverage center: 15 or 24 in. width; front-vented; allow 1–2 in. for ventilation as per the cut sheet.
- Wine cooler: isolate from oven heat sources; damped hinges reduce vibrations that affect aging.
- Icemaker: needs a water line; some units require a gravity drain or pump—plan early.
- Bar sink: small, 12–15 in. bowls work well; add a discreet air gap if required by code.
Comparison Table: Which Layout Fits?
| Option | Best For | Typical Width | Pros | Watch-outs |
|---|---|---|---|---|
| Single-Wall Niche | Condos, small living rooms | 36–60 in. | Compact, budget-friendly footprint | Limited seating and prep space |
| Feature Wall | Open-plan homes | 8–10 ft. | Showpiece with symmetry | Requires straight, uninterrupted wall |
| Under-Stairs | Basements, split-levels | Varies | Uses dead space efficiently | Angles complicate doors/shelves |
| Closet Conversion | Hallways, dens | 48–72 in. | Hidden when closed | Ventilation for appliances |
| Peninsula Bar | Entertaining with seating | 6–8 ft. | Stools, social zone | Needs 42 in. aisles |
Best Practices (Design, Ergonomics, and Durability)
Measure first, then design storage around your bottles and glasses. Keep counters 36 inches high, plan 24-inch depth, and maintain 36–42-inch walkways. Use warm 2700–3000K LEDs, moisture-tolerant finishes, and soft-close hardware. Confirm appliance ventilation and add GFCI outlets for safety.
- Ergonomics: frequent-use bottles at waist-to-shoulder height; heavy cases down low; glass uppers 54–57 in. from floor.
- Moisture control: slab backsplashes or ceramic tile protect drywall near sinks and icemakers.
- Lighting detail: place LED tape toward the front of shelves; use 45° aluminum channels to reduce glare.
- Hardware & hinges: soft-close hinges minimize bounce; consider push-to-open for ultra-clean lines.
- Safety: anti-tip anchors on tall units; child-safe latches if needed; GFCI on any outlet within the splash zone.
Pro tip: Test glassware heights with a cardboard mock-up. It’s a five-minute exercise that avoids shelf miscalculations later.
Tools, Accessories, and Resources
Plan tools for measuring and marking, then specify cabinet accessories that keep glassware and bottles secure. Use a shared checklist to coordinate appliances, lighting drivers, and outlet heights with your installer before fabrication begins.
Planning & Site Tools
- Laser measure + level: verify ceiling height and wall plumb; note any bulkheads.
- Stud finder: typical studs are 16 in. on center; mark anchor points for uppers and floating shelves.
- Electric tester: confirm GFCI function and available circuits for appliances and LEDs.
Cabinet Accessories
- Stemware racks: underside mounts keep rims protected; plan 10–12 in. clearance below.
- Pull-outs: 6–9 in. spice-style pull for syrups and bitters; 12–18 in. tall pull for mixers.
- Drawer organizers: wood or polymer inserts; soft-close slides; consider felt-lined compartments for bar tools.
- Bottle grids: 12 in. deep, adjustable partitions for 750 ml and magnum bottles.
Your Pre-Install Checklist
- Confirm appliance cut sheets (ventilation, electrical, water)
- Mark outlet heights and switch locations on drawings
- Choose LED color temperature (2700–3000K) and dimmer type
- Approve door style, finish sheen, and handle placement
- Verify counter overhangs and any waterfall edges
Schedule a Design Consult (Soft CTA)
Want a 3D preview of your bar before we build it? Our in-house team designs, manufactures, and installs from our Brampton factory so timelines stay tight and communication stays clear.
- In-house design, factory-direct cabinetry, and installation
- 2D/3D drawings so you can approve every detail
- Lifetime-warranty door options and pro spray-booth finishes
Case Studies and Real-World Examples
Successful home bars balance function and style: right-sized appliances, smart storage, and finishes that carry your home’s design language. Here are mini examples inspired by common GTA floor plans to spark ideas for your project.
- Condo niche, downtown style: 48 in. one-wall bar with 15 in. beverage center, glass uppers, and a porcelain slab backsplash. Warm LED strips at 3000K make bottles glow without glare.
- Basement under-stairs: staggered shelving follows the angle; a 24 in. beverage center and 12 in. deep bottle grids use space efficiently.
- Open-plan feature wall: 10 ft. symmetrical towers with a centered sink; tall doors hide recycling and extra glassware; a waterfall quartz top frames the serving zone.
- Closet conversion: pocket doors slide back into side panels; interior finished to match doors; motion sensor LEDs illuminate on open.
Planning a basement bar as part of a larger refresh? See how a coordinated approach aligns with our basement renovation workflow to streamline electrical, plumbing, and finishes.
Local Tips
- Tip 1: Visiting the showroom at 11 Edvac Drive? Bring rough wall measurements and appliance preferences so our designers can sketch options on the spot.
- Tip 2: Winter installs move fast if materials are pre-approved—traffic is lighter, and indoor work is ideal. Approve finishes early so fabrication can start.
- Tip 3: For older GTA homes, panel upgrades are common. Flag any tripping breakers or limited outlets so we can coordinate electrical early.
IMPORTANT: These tips help us tailor storage, lighting, and appliance choices to your space and timeline.
Process: From Idea to Installed Bar
Map the wall, choose a layout, confirm appliances, and approve 3D drawings before we build. On install day, we level boxes, set tops, connect power/water, and aim LEDs. A single, accountable team shortens timelines and reduces miscommunication.
- Discovery: capture rough measurements, wish list, photos of the room.
- Design: 2D plan and 3D visuals; confirm appliance models and outlet heights.
- Selections: doors, hardware, counters, backsplash, lighting temperature.
- Manufacturing: CNC-cut parts; pro spray-booth finishing for consistent sheen.
- Installation: cabinets, counters, lighting, appliance hookups, silicone and touch-ups.
- Final walk-through: adjust doors/drawers, test dimmers and GFCI, review care tips.
Frequently Asked Questions
Below are concise answers to common planning questions—dimensions, appliances, and lighting—so you can move forward confidently and avoid rework.
- How wide should a compact home bar be?
Plan 36–48 inches for a streamlined one-wall setup. That fits a 15-inch beverage center, base storage, and a pair of upper cabinets or shelves with LED strips. - Do I need a sink?
Not always. A “dry bar” without a sink keeps things simple. If you rinse glasses often or want an icemaker, a small 12–15 inch sink with GFCI outlets nearby is convenient. - What lighting works best?
Use 2700–3000K LEDs for warm ambiance. Combine under-shelf tape with interior cabinet pucks, all on a dimmer. Avoid cool 4000K+ temperatures unless your home skews ultra-modern. - What’s the standard counter height?
Most bars use a 36-inch serving counter. If you’re adding stools, a 42-inch raised top with 12–15 inches of knee space feels comfortable for guests. - Can a bar fit under the stairs?
Yes. Stagger shelves with the angle, use 12-inch-deep bottle grids, and add toe-kick LEDs for safety and style. Confirm appliance ventilation in tight cavities.
Conclusion and Next Steps
Great bars start with right-sized layouts, thoughtful storage, and warm lighting. Lock appliances early, preview in 3D, and build with durable finishes. The result is a compact, elegant station that handles daily drinks and weekend hosting without clutter.
- Key Takeaways
- Pick a layout that suits your wall length and traffic flow.
- Match storage to your bottles, tools, and glass types.
- Warm, dimmable LEDs make glass and finishes glow.
- Confirm appliance ventilation and outlet placement.
- Preview with 3D drawings before fabrication.
- Action Steps
- Measure your target wall and gather appliance ideas.
- Visit our 11 Edvac Drive showroom for hands-on material choices.
- Book a design consult to see 2D/3D options and lock your plan.
Thinking bigger than the bar? Our integrated approach syncs with broader kitchen and whole-home updates—see how designs align with our kitchen renovation planning and staged home renovation process to keep timelines tight.
Related Guides in Our Kitchen Cluster
Explore connected topics in your planning: backsplash layouts for beverage zones, quartz top selection, closet conversions that double as “hidden bars,” and practical timelines for renovation project management. Ask our team to share 3D samples that match your style.
Final CTA: Ready to design your bar? Book a discovery session at our Brampton showroom (11 Edvac Drive). We’ll map your space, preview finishes, and create a build-ready plan.
Related Posts

Why Choose Kitchen Renovation Company
Nowadays, Kitchen spaces are not only a place for cooking and serving food, but these areas act as a statement, as they speak a lot about a family, the philosophy and personality of individuals, and spaces. If you admire aesthetics and adorn the beauty of your home, you must pay attention to the interior design […]
How a Kitchen Renovation Contractor is Changing the Game
Lifestyle is all about bringing something coherent to the overall experience of living. The kitchen and closets stand as two of the most influential spaces in a home that add to the overall experience of living. A Kitchen Renovation Contractor in Whitby by the name of Altima Kitchen and Closets Inc. is changing the overall […]
How Media unit contractor in Whitby is Changing the Game
Lifestyle is all about bringing something coherent to the overall experience of living. The kitchen and closets stand as two of the most influential spaces in a home that add to the overall experience of living. A Media Unit Company in Whitby by the name of Altima Kitchen and Closets Inc. is changing the overall […]