How to Remodel a Small Bathroom with a Shower (2026 Guide)
A small bathroom remodel with a shower is the systematic redesign of a compact bath to improve flow, waterproofing, ventilation, lighting, and storage without enlarging the footprint. Common clearances include about 21 inches in front of fixtures and a minimum shower area near 30×30 inches. Around 11 Edvac Drive, our one-team process coordinates design, factory cabinetry, and installation.
By Ashok — Altima Kitchens and Closets
Last updated: 2026-06-04
Overview
Remodel a small bathroom with a shower by locking measurements, selecting a space-efficient layout, ensuring robust ventilation, building a continuous waterproofing envelope, layering ambient and task lighting, and integrating built-in storage. A disciplined sequence—plan, demo, rough-in, waterproof, tile, fit fixtures, finish—keeps quality high and surprises low.
This overview frames what matters most in tight rooms: precision. In small baths, one misaligned line or weak fan snowballs into daily frustration. We’ll show layouts that feel bigger, storage that doesn’t crowd, and a step-by-step playbook we use across GTA homes and condos.
- Space planning first: Confirm door swings, shower entry, and 21-inch clear paths.
- Right-size ventilation: Aim near 50–80 CFM and quiet operation (about ≤1.5 sones) so it’s used daily.
- Watertight shower assembly: Continuous membrane across pan, walls, corners, niches, and benches.
- Light in layers: Ambient + task + accent eliminates shadows that make rooms feel cramped.
- Factory-built storage: Floating vanities, mirrored cabinets, and organizers maximize utility.
- Quality checks: Flood-test pans ~24 hours and laser-check tile lines before grouting.
Local considerations for 11 Edvac Drive
- Seasonal humidity swings can be steep. Use a humidity-sensing fan and seal every penetration to prevent winter condensation and summer mold growth.
- Spring and fall are peak renovation windows. Pre-book selections; our in-house factory keeps lead times predictable across the GTA.
- Many condos near 11 Edvac Drive require elevator bookings and specific work hours. We coordinate approvals, lay-down, and debris handling to avoid delays.
 1")
Introduction
A successful small bath with a shower aligns layout, waterproofing, ventilation, lighting, and storage into one coordinated plan. In our GTA projects, the biggest wins come from 2D/3D design previews and factory-direct cabinetry that fit right the first time.
Here’s the thing—square footage is fixed, but the experience isn’t. A 5×8 room can feel generous with a frameless glass line, a floating vanity, and centered niches. We wrap design, manufacturing, and installation together, so there’s a single accountable team from demo day through handover.
- What you’ll learn: Practical layouts, code-minded clearances, waterproofing methods, lighting formulas, and an installation sequence you can follow.
- Real examples: We’ll reference our custom cabinetry, mirror storage, organizers, and lighting upgrades from recent GTA projects.
- One-stop advantage: In-house design and installation, factory-direct cabinetry, lifetime-warranty door options, and proactive communication at every stage.
For broader process control, see our design-build remodel guide. A single provider reduces handoffs and keeps schedules tighter—vital in compact, finish-sensitive spaces.
Before You Start (Prerequisites)
Lock your plan before demolition: confirm measurements, choose the shower format, right-size ventilation, and pre-select finishes. Sign off on drawings, elevations, and a full material list. This clarity prevents late changes and accelerates approvals and installation.
Measure and verify constraints
- Structure and slope: Note joist direction/spacing; curbless designs often require a recessed subfloor and exact slopes (~1/4 inch per foot).
- Fixture clearances: Keep about 21 inches in front of the toilet and shower entry; maintain at least 15 inches from toilet centerline to side obstacles.
- Door and glass swings: Avoid conflicts between the bath door and shower door. Consider pocket or outswing entries in very tight plans.
Document plumbing vents and supply lines, and map outlet counts. In small rooms, a dedicated 20A GFCI-protected circuit for receptacles plus a separate lighting circuit is a practical baseline.
Choose the right shower format
- Alcove (tub-to-shower): Works well in 60-inch runs; straight walls simplify glass and tiling.
- Corner/neo-angle: Frees circulation space and suits many condo baths; precise glass angles demand careful tile layout.
- Curbless walk-in: Seamless look and accessible entry; requires subfloor planning and exact pitch control.
In our condo projects, corner showers often reclaim perceived space by moving glass away from the main path to the vanity. In detached homes, converting a 60-inch tub to an alcove shower with a wide niche and a linear drain delivers a spa feel without crowding.
Ventilation and moisture plan
- Fan sizing: Start in the 50–80 CFM range for small rooms; quieter fans (around ≤1.5 sones) see more daily use.
- Duct runs: Keep them short, insulated, and terminated outside to avoid condensation.
- Controls: Add a humidity sensor or timer so the fan runs 20–30 minutes post-shower.
Moisture is relentless. We seal valve penetrations, light housings, and trim plates, and we verify a small undercut at the door for make-up air so the fan can actually move room air.
Material and finish selections
- Tile strategy: Use 2×2 mosaics or similar on floors for traction and slope conformance; simplify walls with larger tile to reduce grout lines.
- Glass: Frameless panels expand sightlines; protective coatings reduce spotting and maintenance.
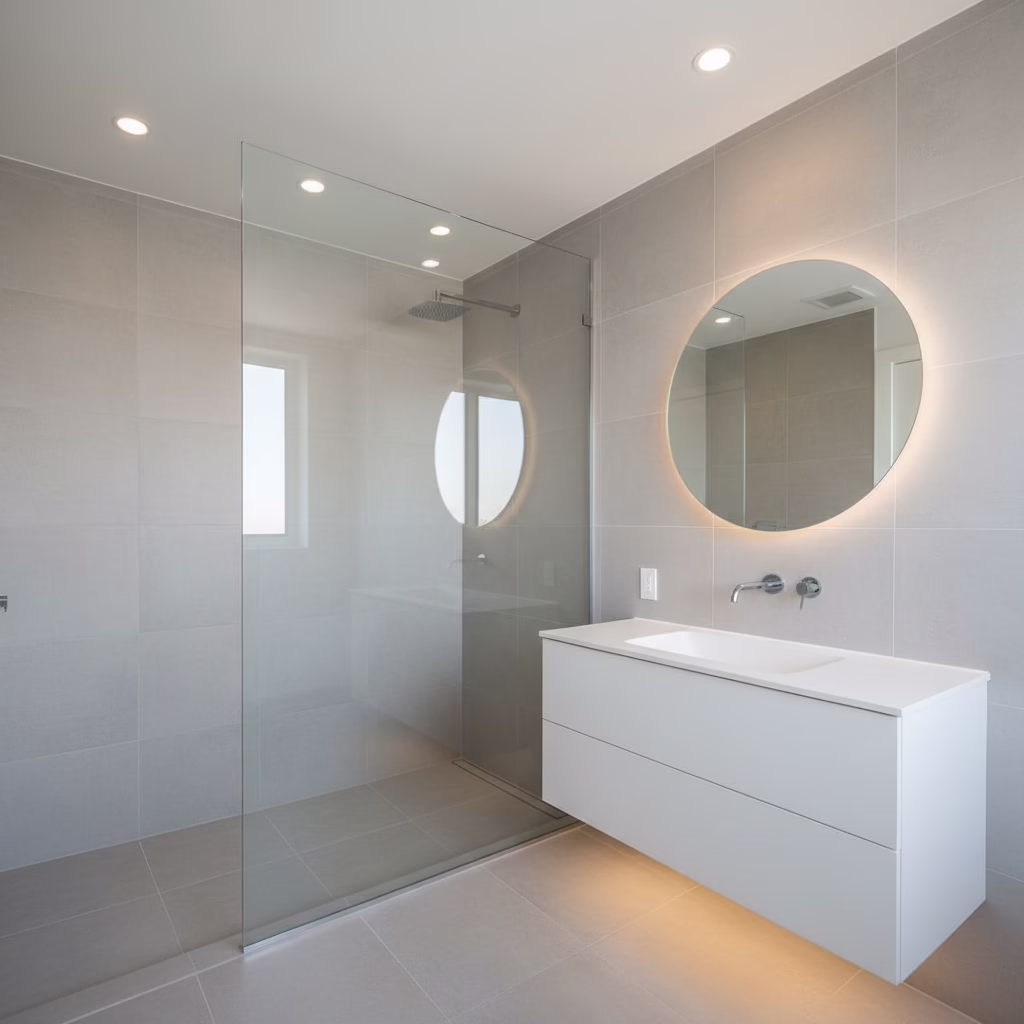
- Cabinetry: Floating vanities, mirrored medicine cabinets, and tall shallow storage (9–12 inches) preserve circulation.
- Lighting: Target roughly 50–70 lumens per square foot; warm-white color temperatures create a calm atmosphere.
We preview palettes in 2D/3D so you can see how grout contrast, mirror dimensions, and sconce placement change brightness and balance before we manufacture your vanity.
Step-by-Step Process
Use a predictable sequence: document, demo, rough-in (plumbing and electrical), waterproof, tile, set fixtures and glass, integrate storage, and finish. Verify at each stage with flood tests, pressure checks, and laser lines.
1) Document the space
- Measure every wall, ceiling height, window opening, and vent route; note out-of-square or out-of-plumb walls.
- After demolition, photograph studs and services. These images guide blocking locations for accessories and glass anchors.
- Convert field dimensions into annotated elevations for valve heights, niche centers, and mirror edges.
In our experience, annotated as-builts eliminate guesswork when tile starts. They also ensure accessories land on blocking, not hollow drywall.
2) Layout and framing
- Frame pony walls, benches, and niches to design. Check plumb/square with a long level or laser.
- Pitch shower floors ~1/4 inch per foot toward the drain. Recess the subfloor for curbless thresholds.
- Add blocking for towel bars, grab bars, and glass hinges—future-proofing without visual clutter.
Even a 1/8-inch twist in a corner telegraphs through tile. We plane and shim until corners and planes meet tight tolerances so grout joints remain even.
3) Plumbing rough-in
- Center and set the drain; install a pressure-balanced valve or thermostatic mixer at a comfortable control height.
- Locate the shower head and handheld heights intentionally; consider a second shutoff if your condo board requires it.
- Pressure-test lines before closing walls to catch leaks when fixes are easiest.
Low-profile linear drains simplify the geometry of slopes in tight footprints, and they look clean with large-format floor tile flowing into the pan.
4) Electrical and lighting rough-in
- GFCI-protect receptacles; separate lighting circuits for mirror/task and ambient zones.
- Use damp-rated recessed fixtures where allowed; add toe-kick lighting under floating vanities for soft night light.
- Pre-wire for backlit mirrors or dimmable sconces to balance face lighting.
Layered lighting removes harsh shadows and makes small rooms feel wider. Even vertical light at the mirror is the difference between “fine” and “fantastic.”
5) Waterproofing
- Install cement board or foam board; tape and thinset seams. Transition cleanly at niches and benches.
- Apply a continuous waterproofing membrane (liquid or sheet) across walls, corners, niches, benches, and floor.
- Seal all penetrations (valves, shower head arms, fasteners). Flood-test the pan for ~24 hours.
Tile is decorative; membranes do the real water work. We treat niches like outside corners so daily splash doesn’t find a path behind tile.
6) Tile setting
- Strike a level datum line at eye height and build courses from there; this hides floor unevenness at the base cut.
- Use mosaics on floors for traction and slope conformity; maintain even grout joints and clean thinset squeeze-out.
- Back-butter large-format tile for full coverage; miter outside corners for a crisp, modern edge.
We stage cuts from the same batch to keep tone and veining continuous around corners. In a small bath, one mismatched tile stands out immediately.
7) Fixtures and glass
- Set the vanity, hang the mirrored cabinet on blocking, and align accessories at comfortable reaches.
- Fit frameless glass with even reveals; verify door swing and seal contact along the threshold and jambs.
- Silicone transitions after a dry fit confirms alignment; let it cure fully before commissioning.
Frameless glass extends sightlines and visually widens narrow rooms. Minimal hardware keeps the composition calm and clean.
8) Storage integrations
- Choose drawer organizers, tray dividers, and tilt-out trays in floating vanities.
- Add a tall, shallow cabinet (about 9–12 inches deep) for linens if traffic paths allow.
- Center shower niches to common bottle heights (10–12 inches) and line them with matching or accent tile.
Our custom bathroom renovation approach leverages factory-direct cabinetry and 2D/3D drawings, so storage components land exactly where your routines need them.
9) Finishes and sealing
- Grout and seal per manufacturer specs. Stain-resistant grouts help in high-use areas.
- Caulk plane changes; avoid grouting corners to reduce cracking from movement.
- Set mirrors, trim plates, hooks, and bars; confirm consistent heights and levels.
We use neutral cleaners on first wipe-downs to avoid haze and protect fresh silicone while it cures.
10) Quality checks and handover
- Run the bath fan on a timed cycle; verify a small door undercut for make-up air.
- Spray-test glass and corners; confirm pan weeps and drain performance.
- Document serials, finishes, and blocking maps; walk through care routines with you.
Our handover packet includes photos of hidden blocking and valve positions—gold when you add a shelf later or swap a trim plate years down the road.
| Shower type | Best for | Typical footprint | Complexity |
|---|---|---|---|
| Alcove (tub-to-shower) | Straight walls; quick glass; classic 5-foot runs | 60″ × 30–34″ | Low–Medium |
| Corner / neo-angle | Freeing floor area; condo layouts | 38–42″ sides | Medium |
| Curbless walk-in | Seamless look; aging in place | 48–60″ length | Medium–High |
Schedule a consultation
 2")
Troubleshooting
Most small-bath issues trace to slope, sealing, airflow, or lighting. Confirm a ~1/4 inch per foot floor pitch, continuous membranes at corners and niches, at least ~50 CFM exhaust, and balanced, glare-free lighting. Address minor grout or caulk failures quickly.
- Slow drainage: Check slope and clear the trap. Linear drains can simplify tight layouts and improve flow.
- Leaky corners: Re-caulk plane changes; niches must be fully wrapped. Inspect gaps at valve trims.
- Foggy mirrors: Extend fan runtime to 20–30 minutes. Insulate ducting and reduce elbows if possible.
- Cold floors: Consider radiant mats during remodels; warmth helps surfaces dry faster post-shower.
- Low water pressure: Clean aerators and verify supply stops. For installation nuances, browse this set of shower installation topics.
Uneven grout color often points to inconsistent mixing or premature washing. Regrouting specific joints with a matched product can restore uniform tone without a full redo.
Advanced Tips (Optional)
Maximize function without visual clutter: go curbless, recess storage, add dimmable layered light, and use factory-built vanities with interior organizers. Precision in framing and membranes delivers a spa feel in a room the size of a closet.
- Curbless thresholds: Recess the subfloor and use a bonded, continuous membrane. Keep glass minimal for a clean line.
- Heated floors + timers: Warmth encourages post-shower venting and faster dry-down—less moisture sitting on grout.
- Glass coatings: Hydrophobic coatings keep panels clearer longer; pair with a daily squeegee habit.
- Smart controls: Digital valves and occupancy sensors add comfort without visible bulk.
- Vertical storage: Tall, shallow cabinets (9–12 inches) keep towels close without choking walk paths.
Renovating an older bath? We unpack surprises like lath-and-plaster walls, offset drains, and outdated circuits in our old bathroom renovation guide.
Additional Resources
Use these deep dives to plan with confidence: our design-build approach, bathroom-specific workflows, and renovation sequencing. These resources reflect the one-team delivery we provide from drawings to install.
Explore our custom bathroom renovation overview for organizers, lighting, and waterproofing best practices. If your bath update is part of a larger home renovation, our end-to-end design-build guide shows how single-team delivery reduces friction.
Planning scope across multiple rooms? See a kitchen renovation before/after and a primer on cabinet remodel mistakes to understand sequencing and decisions. For budgeting considerations without numbers here, our structured process in this bathroom budgeting walk-through explains how scope choices drive timelines and selections.
For third-party context on upgrade ideas and benefits, glance at this summary of bathroom remodeling advantages and a practical list of common bathroom upgrades.
Frequently Asked Questions
Here are short answers to the small-bath shower questions we hear most—clearances, tile sizes, permits, and timeframes—so you can move confidently from planning to build.
Can a 5×8 bathroom fit a walk-in shower?
Yes. A typical 5×8 layout can support an alcove or corner walk-in shower. Keep a clear 21-inch path in front of fixtures, pitch the pan about 1/4 inch per foot, and use frameless glass to extend sightlines. Floating vanities and mirrored cabinets recover storage without crowding.
Do I need a permit for a small bathroom remodel with a shower?
Permits depend on scope. Structural, plumbing, electrical, or layout changes usually trigger permits, while like-for-like finish swaps may not. We review your scope during design, prepare drawings, and coordinate with your building or condo board requirements.
What tile size works best on a small shower floor?
Smaller mosaics, around 2×2 inches, follow slopes and increase traction. On walls, larger format tile reduces grout lines and visual noise. Choose grout that either blends for calm or contrasts to highlight patterns.
How long does a compact bath remodel usually take?
Timeframes vary by scope and building rules. A focused small-bath remodel spanning demo, rough-ins, waterproofing, tile, fixtures, and glass typically takes several weeks. Factory-direct cabinetry and a one-team schedule help keep dates predictable.
Key Takeaways
Measure precisely, keep clearances, and build a continuous waterproofing envelope. Right-size the fan, layer lighting, integrate factory-built storage, and follow a strict installation sequence for a small bath that feels bigger and lasts longer.
- Plan first: Drawings, elevations, and selections prevent mid-project change-ups.
- Water + air control: Continuous membranes and a quiet, effective fan protect finishes.
- Light + glass: Even face lighting and frameless glass open small rooms.
- Storage that fits: Floating vanities, mirrored cabinets, and tall shallow units add capacity without crowding.
- One accountable team: Design, factory, and install under one roof keeps quality consistent.
Conclusion
The best small-bath shower remodels are precise: airtight plans, watertight assemblies, and layered lighting with integrated storage. When one team designs, manufactures, and installs, quality rises and handoffs drop.
We’ve found that homeowners decide faster when they can see the end result early. Our 2D/3D previews, Italian CNC-manufactured cabinetry, and lifetime-warranty door options make decisions tangible—and installation smooth.
- Action steps: Measure, gather inspiration, book a design session, and review drawings.
- What we handle: Design, permitting support, in-house manufacturing, and on-site installation.
- Where we work: Across the GTA near 11 Edvac Drive, with condo and detached-home experience.
Ready to start? If you’re near 11 Edvac Drive and want a compact shower remodel handled end-to-end, we’d love to help. Book a discovery session and preview your layout in 3D before we build.
Related Posts

Why Choose Kitchen Renovation Company
Nowadays, Kitchen spaces are not only a place for cooking and serving food, but these areas act as a statement, as they speak a lot about a family, the philosophy and personality of individuals, and spaces. If you admire aesthetics and adorn the beauty of your home, you must pay attention to the interior design […]
How a Kitchen Renovation Contractor is Changing the Game
Lifestyle is all about bringing something coherent to the overall experience of living. The kitchen and closets stand as two of the most influential spaces in a home that add to the overall experience of living. A Kitchen Renovation Contractor in Whitby by the name of Altima Kitchen and Closets Inc. is changing the overall […]
How Media unit contractor in Whitby is Changing the Game
Lifestyle is all about bringing something coherent to the overall experience of living. The kitchen and closets stand as two of the most influential spaces in a home that add to the overall experience of living. A Media Unit Company in Whitby by the name of Altima Kitchen and Closets Inc. is changing the overall […]